

Drone News
-
Posts
729 -
Joined
-
Last visited
Content Type
Profiles
Forums
Events
Posts posted by Drone News
-
-

INTRODUCTION
The iFlight iH3Pro is a new 3″ FPV racer equiped of a builtin Runcam Split Mini module. Thanks to it, we can both broadcast the FPV signal in the 5.8G band while recording HD videos in 1080p@60fps with low latency. Ideal to shoot beautifull videos with you favorite acro/low riding sessions. The iH3Pro adopts a F4 Flight controller based with 25A 4-in-1 ESC, strong enough for 4S usage. Motors are strong 1408/4100Kv model. The entire frame is fully 3K carbon based. This machine is a direct competitor of the SPCMaker S125. Let’s have a look.
BOX CONTENT
+ 1 x iFlight iH3Pro (with a 1S 120mAh LiPo directly soldered)
+ 4 x Props (2 CW, 2 CCW)
+ 1 x 5.8G RHCP antenna
+ 1 x XT30 to JST adaptor
+ 1 x Allen key
+ 1 X 5V Voltage regulator
+ 1 x Antenna tube
+ 1 x Spare battery strap
+ 1 x 3M Duallock bandFirst (bad) surprize, no props in the box…. It was expected to be present…..
OVERVIEW
The machine is a 140mm…. so larger than the SPC S125.
3mm for arms …. while the other elelements are at least 2mm large.
The entire structure looks very durable. That’s a good point.
-FRONT VIEW
-SIDE VIEW
Two 2-layers electronic towers are installed. On the front it’s the runcam one where a microUSB port is here to retrieve recorded files. The middle one from bottom to top is the 4-in-1 ESC board and the VTX board respectively. Finally the flight controller is installed on the top carbon plate.
The Runcam split mini can be controlled via the two right latteral button. Notice the autorecording option is turned on by default. Whatever, you will need to press at least once the front button to stop recording. If not done…. your fabulous flight session footage will be gone for ever. An open question is here. Is-it possible to control recording and generally the Runcam options via the OSD ? If yes, the module must be connected to a free UART port of the FC. During the disassembling, we will be able to answer to this question.
Just nearby the Flight controller, the 2.4G receiver, here a FrSky XM+. The bind button is not directly available. You will need to slide a bit the module to access to the bind button.
-REAR VIEW
No specific racing LED bars…. Notice a 3D printed structure jailing two large caps filtering most of the motors’s interferences. It’s a good point since the Split mini module is known to be very sensitive to external noise.-UPPER VIEW
-WEIGHT
Almost 250g…. with a 4S 550mAh battery. It’s a lot… close to 30g more heavier than the SPCMaler S125 with the same battery configuration.
Motors
1406 motors … with relatively low KV performances for being 4S compatible.
5mm shaft section
Camera module
The lens module is well protected from frontal crash
and it’s possible to apply an orientation up to +40 degrees approximatively
Disassembling
If the VTX is well connected for smart audio capacity…. unfortunatly, no other dedicaced link between the FC and the runcam split mini can be observed. In fact, the reason is simple: there is no more free UART port on the flight controller available.
UNBOXING, ANALYSIS, CONFIGURATION AND DEMO FLIGHT
The machine comes with Betaflight 3.3 installed and out of the box this version don’t support Smart Audio feature :(. You will need at least to uppgrade to the version 3.4 and above minimum. The VTX control is done via the UART3 so you will need to turn on smart audio on it.
As already mentioned, no RSSI feedback with the current XM+ receiver. You will need to flash it via your own …. and since the receiver is directly soldered… the work will be a bit more complex for the upgrade :(. Clearly…. the time passed for polishing the software section by Iflight was not enough. Even more ….. when you will first take of with the machine in any stabilized mode…. the machine will show ownfull yaw jitter behaviour !!!! It’s clearly unflyable and HD recording are also deeply impacted with this problem. After further inspection, the problem comes the flight controller, more particulary from the MPU 6-axis chip. This one whatever the Gyros Freq used, presents high sensitivity to noise .In order to reduce/kill these artefacts, I had to untight the four nylon bold holding the flight controller on the top carbon plate. Like this most of the problems are gone. Perfect results shall be obtained if some foam can be inserted between the FC and the top carbon plate.
With this workaround, results are billions time better…… But what a shame that Iflight didn’t detect this problem from factory. It’s a typical problem met when the design staff is far away from the production area…. Outsourcing consequence IHMO.
The machine fixed offers super smooth HD videos… like a full 3-axis stabilized could offers…. The machine is powerfull in 4S but due to it’s extra weight it’s less sporty as the S125 can be. Default PID settings already offer great stabilization and a almost propwash free situation can be reported. Thanks to the variable VTX output power, the FPV range is great. On the FPV signal, only a slight noise can be noticed. The latency of Runcam split mini is really low… compatible at 100% with fast acro style flying.
CONCLUSIONS
This machine requires a lot of work out of the box and due to the highly sensitive MPU chip, perfect 100% jitterfree behaviour can’t be promised. The guilty is the flight controller. Twice guilty: 1) for having bad MPU 6-axis chip and 2) to not have any free UART port for the Split mini controls. Being said …. I can’t recommend this machine. At least the SPC Maker S125 is a better machine. More… a new SPC K1 model will come soon with the Runcam Split Mini 2 module. It will be a 95mm 4S light FPV racer….
PROS
+ Jellofree 1080p@60 fpv
+ 4S compatible
+ DurableCONS
MPU GYRO/ACCELERO HIGHLY SENSITIVE TO VIBRATIONS
– FrSky XM+ not flashed with RSSI compatible firmware
– BF 3.3 pre-installed not compatible with smart audio control
– No free UART port for RunCam Split Mini controls
– HeavyThis quadcopter have been courtesy provided by Banggood in order to make a fair and not biased review. I would like to thank them for this attitude.
You can find it actually for 251USD at https://www.banggood.com/IFlight-iH3-Pro-3-inch-FPV-Racing-Drone-BNF-F4-25A-4-in-1-ESC-Flytower-48CH-025100200mW-VTX-p-1338220.html -
Just few weeks after their first Runcam Split Mini competitor, Caddx is already their Turtle FPV-HD cam ultralight combo with a V2: https://www.banggood.com/Caddx-Turtle-V2-1080p-60fps-FOV-145-Degree-Super-WDR-Mini-HD-FPV-Camera-OSD-Mic-for-RC-Drone-p-1360782.html
We still have a 1080@60fps builtin HD recorder coupled with a 800TVL CVBS FPV sensor. It’s still super light (~12g) but they improved some details:
– Now the mounting holes are more standard for 20mmx20mm support
– A mic is added
– A new lens (FPV about 170 degrees)
– New settings improving the general video quality.With the Runcam split mini 2 recently introduced as well, seems there is a new war for 2-in-1 ultra light FPV-HD cam combo. The main question is about the associated latency. With the original Turtle, the latency was about 50-70ms… so almost twice more than the runcam split mini. I guess probably relatively soon a cheap FPV racer will be introduced with this combo pre-installed. Wait & See.
The Caddx Turtle allows both a live FPV feed and an HD DVR, without the weight of a heavy HD action camera. The Turtle V2 brings many improvements over the original, including a new lens, audio, better mounting options, and a better image. Caddx has introduced a new competitor in the HD FPV camera category. The Caddx Turtle is a 1080p 60fps capable mini fpv camera split into two parts, the FPV camera and an HD DVR board. Users who are constantly deciding whether or not to use an HD action camera may find this option perfect for their needs, especially those interested in shedding the weight of a heavy action camera but still want HD recording.
Specification:
Image sensor: 1/2.7″ CMOS sensor
Horizontal: 800TVL
TV system: NTSC/PAL,changeable
Video Resolution: 1080P@60fps / 1080P@30fps / 720@60fps
Power Input: DC 4.5-20V
FPV FOV: 155°
Recording FOV: 170°
Mini Illumination: 0.01lux
Image Resolution: 2 Megapixels
Lens: 1.8mm Turbo Eye Lens
Working Current: 380mA@5V/160mA@12V (low consumption)
OSD Menu: Yes (Support Voltage Display)
Video Files: MP4
Audio: Support
Electronic Shutter : PAL : 1/50-100,000 NTSC : 1/60-100,100
S/N Ratio: >60dB (AGC OFF)
Video Output: CVBS
Max Micro SD Card Supported: 8-64GB(need Class 10 or above, recommend Class 10/UHS-I/UHS-II)
Net weight: 12g(more or less)
Color: Red/BlackFeatures:
-New Turbo Eye lens
-More rational PCB layout and 20x20mm mounting holes – no offset hole!
-Microphone
-Wrapped cable
-Default image setting improvementsQuick operation guide:
1. RIGHT BUTTON: Press the RIGHT button for 3s-5s to activate video recording, in the meanwhile the light on the lower right corner will flicker.
2. LEFT BUTTON: Press the LEFT button for 3s-5s to stop video recording.
3. DOWN BUTTON: Press the DOWN button for 3s-5s to switch the resolution, 720P with Blue LED on, 1080P with Red LED on, the default mode is 1080P.
4. MIDDLE BUTTON: The MIDDLE button is the menu button.
Notice: The camera need at least 8G Class 10 SD card.
Notes: If the power is cut accidentally when video recording, please power on again, then the camera will automatically restore the memory,
and the video records before power cut will be still saved in TF card.Package included:
1 x Caddx Turtle V2 Camera
1 x 5D-OSD Menu Board
1 x Bracket for camera
1 x 30x30mm mounting bracket
1 x 4pin FPV Silicon Cable (extend into a 2pin joint for OSD board and a 3pin joint for FPV)
1 x Internal hexagonal wrench
1 x Manual
1 x Warranty card
Note: Full-size metal bracket shown in some photos is not included at this time. -
Here is a direct competitor of the BetaFPV Beta65X, in fact more in 75mm format. It’s a brushless 2S 75mm tinywhoop machine with new 0802 16000Kv: https://www.banggood.com/Happymodel-Mobula7-75mm-Crazybee-F3-Pro-OSD-2S-Whoop-FPV-Racing-Drone-w-700TVL-Camera-BNF-p-1357971.html
We have a F3 flight contoller with a builtin OSD. For the ESC, a builtin 4-in-1 5A (peak @6A) flashed with the last 16.7 BLheli_S firmware compatible with ESC buzzing. Four choices of receiver are proposed: 2 are directly integrated via SPI connexion (FlySky AFHDS-2A & FrSky D8/D16 non-EU) and two with an external receiver (FrSky D16 EU & DSMX/DSM2). For the AIO FPV, a basic 700TVL NTSC CMOS camera coupled with a 25mW/40CH 5.8G VTX. I regret the absence of a 100mW mode and the absence of smart-audio OSD controls. In term of weight, the machine should reach 39g with the batteries installed. So clearly still compatible with indoors applications while having the 2S power for fast outdoors runs. I hope there will be a 65mm version as well…. probably even more lighter.
Specification:
Brand Name: Happymodel
Model: Mobula7
Item Name: 75mm Wheelbase 2S Brushless Whoop FPV Racing Drone
Wheelbase: 75mm
Version: Basic Version / Standard Version ( Optional)
– The diffirence of them are the package charger.
Basic Version: USB Charger
Standard Version: 6-way Charger
Receiver ( Optional): Compatible Frsky NON-EU Receiver
Compatible Frsky EU-LBT Receiver ( XM+ Receiver)
Compatible Flysky AFHDS/ AFHDS-2A Receiver
Compatible DSM2/DSMX Receiver
Size: 98mm*98mm*36mm
Weight: 25.9g (without battery)Crazybee F3 Pro Flight Controller
Item Name: Crazybee F3 Pro FC
MCU: STM32F303CCT6 (72MHZ, 256K FLASH)
Sensor: MPU-6000(SPI connection)
Board size: 28.5 * 28.5MM
Power supply: 1-2S battery input (DC 3.5-8.7V)Built-in 5A(each) Blheli_S 4in1 ESC Dshot600 ready
Built-in Receiver ( Diffirent version having diffirent receiver)
Built-in Betaflight OSD(SPI Control)
Built-in Current meter Max 14A
Built-in 5V 0.8A BEC with LC filter
Built-in voltage detection
BLHELI_S pass-through Ready
Heading LED ReadyFirmware
(Frsky version) CRAZYBEEF3 PRO FR Firmware target: CrazybeeF3FR
(Flysky version) CRAZYBEEF3 PRO FS Firmware target: CrazybeeF3FS
(DSM2/DSMX version) CRAZYBEEF3 PRO Firmware target: CrazybeeF3DX
(Frsky EU-LBT version) CRAZYBEEF3 PRO FS Firmware target: CrazybeeF3FSOnboard 5A 4 In 1 ESC
Power supply: 1-2S LiPo/LiPo HV (3.5v/8.7v)
Current: 5A continuous peak 6A (3 seconds)
Support BLHeliSuite programmable
Factory firmware: O_L_5_REV16_7.HEX
Default protocol: DSHOT600Onboard Frsky NON-EU receiver Version
SPI BUS receiver
Frsky D8/D16 switchable
Compatible Non EU transmitter both D8 and D16 mode
Channels: 8ch or 16ch
Failsafe support
No ground interference ( Transmitter and receiver 1 m from the ground): 300mOnboard Frsky EU-LBT Version
(XM+ receiver)
Operating Voltage Range: 3.7~10V
Operating Current: 30mA @5V
Operating Range: Full range
With RSSI output on board: Analog 0~3.3V
Firmware Upgradeable, Default firmware EU-LBT with RSSIOnboard Flysky receiver Version
SPI BUS receiver
Protocol: AFHDS and AFHDS-2A Switchable
Channels: 8ch(AFHDS) or 14ch(AFHDS-2A)
Failsafe support
No ground interference ( Transmitter and receiver 1 m from the ground): 300mOnboard DSM2 / DSMX receiver version
Serial bus receiver
Protocol: DSM2/DSMX compatible
Channels:6-9 (Depend on your radio)
No ground interference ( Transmitter and receiver 1 m from the ground): 300mSE0802 16000KV Motor
Model: SE0802
KV: 16000KV
Configu-ration: 9N12P
Stator Diamter: 8mm
Stator Length: 2mm
Shaft Diameter: Φ1.0
Motor Dimension (Dia.*Len) : Φ10.5*14.5mm
Weight: 1.8g
Support 1-2S LipoNo.of Cells: 1S Lipo
Propeller
40mm 3-blade Propeller ( 4 CW + 4 CCW)5.8G VTX AIO Camera
5.8G 40CH 25mW VTX
Output power: 25mw
Frequency: 40CH
Input voltage: 3.3V 5.5V
Current consumption: 300mA(type)
700TVL FOV120 Camera
Camera resolution: 700TVL
Field of view: 120°
Video Format: NTSC
Antenna: RG178 antenna
Frequency: 5.8GHz 5bands 40 channels
With Raceband
Smartaudio ready(Frsky EU-LBT and DSMX version not compatible)
Size: 13.9″12.0mm ( L*W )
Weight: 3gLipo Battery
Capacity:250mAh
Voltage:3.8v
Continuous Discharge Rate: 30C
Instantaneous discharge rate: 60C
Size: 55mmx12mmx7mm
Weight: 6.5g
Connector: PH2.0
Notes: Need 2pcs batteries for Series circuitFeatures:
– New Crazybee F3 PRO Flight controller 1-2s Lipo compatible
– 2S whoop more powerful and more flight time
– Betaflight support , multi flight mode: ACRO/AIR/ANGLE
– New 0802 Powerful and High efficiency Brushless motor and Smooth ESC
– Smartaudio ready , change VTX bands, channels via OSD
DSM2/DSMX and Frsky EU-LBT version are Serial-based receiver, so Smartaudio is not compatible.
– Adjust the settings and the PID of the flight controller via OSD
– Frsky Non-EU version support NON-EU Frsky transmitter D8/D16 compatible
– Flysky version support both AFHDS and AFHDS-2A protocol transmitter
– DSM2/DSMX version support DSM2 and DSMX compatible Spektrum transmitter
– Frsky EU-LBT version support Frsky EU-LBT firmware transmitter
– Full telemetry function ready
– Head lights ready
– Camera angle adjustable
– Real Bind and Fly version
– Buzzer ReadyPackage Included:
Basic Version
1x Mobula7 75mm FPV Drone
4x 40mm 3-Blade Propellers ( 4 CW & 4 CCW)
4x 3.8v 250mah 30C/60C Lipo battery
1x USB Lipo/LIHV Charger
1x Fixing Mount for Lipo Battery
1x Propeller Disassemble Tool
1x ScrewdriverStandard Version
1x Mobula7 75mm FPV Drone
4x 40mm 3-Blade Propellers ( 4 CW & 4 CCW)
4x 3.8v 250mah 30C/60C Lipo battery
1x 1S06 6 Way Lipo/LIHV charger
1x Propeller Disassemble Tool
1x Fixing Mount for Lipo Battery
1x Screwdriver -
I was sure after the introduction of the Runcam Split Mini 2 that the first micro-racer with a builtin model will be soon introduce. And it’s already the case with the new SPCMaker SPC-K1: https://www.banggood.com/SPCMaker-SPC-K1-95mm-Omnibus-F4-20A-BL_S-FPV-Racing-Drone-PNP-BNF-w-RunCam-Split-Mini-2-Camera-p-1357411.html
We have a super compact 95mm machine, 4S compatible with strong 1105/6000 KV motors, 20A 4-in-1 ESC board Dshot 600 compatible. The frame is 3K based with main probably 2mm arms. The machine without battery and without receiver is about 91g !!! so around 93g with a receiver and add 40g more for a 4S 550mAh battery. Really impressive for a machine able to shoot 1080p@60fps video. The machine is sold in PNP version or in four different BNF versions with classic option: FrSky D16, FlySky AFHDS-2A, Spectrum DSM2/X and Futaba. I really hope the split 2 mini will be connected to a spare UART port of the FC in under to control dedicaced OSD options and video triggering. After the good SPCMaker S125, this SPC-K1 looks like even better. The new 2.5″ reference ?. I will ask one for review.
Specification:
Brand Name: SPC Maker
Model: K1
Item Name: 95mm Omnibus F4 FPV Racing Drone
Wheelbase: 95mm
Material: 3K Carbon Fiber
Version: PNP ( Without Receiver )
Compatible DSM2/X Receiver
Compatible Frsky Receiver
Compatible Flysky Receiver
Compatible Futaba Receiver ( Optional)
Size:87x91x30mm
Weight: 91g ( battery not include)Omnibus F4 Flight Controller
Item Name: Omnibus F4 Flight Controller Integrated with OSD PDB BEC
Firmware: OmnibusF4SD
Main Chip: STM32F405
MPU6000 6 aixs SPI Gyro & Acc
BEC: 5.1V@1.2A
Size: 27x27mm
Mounting Hole: 20x20mm
Weight: 3.5g
DShot1200 Support
SBUS/PPM and Speketrum DSM Ports 5.5V BEC SupportBrushless Motor
1105 6000KV Brushless Motor20A BL_S 4in1 ESC
Item Name:20A BL_S 4in1 ESC
Con. Current: 20A
Input Voltage: 2-4S Lipo Support
BEC: NO
Firmware: BLheli_S
Dimension: 29x31mm
Mounting Hole: 20x20mm
Weight: 4.9g
Support DShot150, DShot300 and DShot600
Don’t Recommend PWMEmax Avan Blur 2 Inch Propeller
Item Name: Emax Avan Blur 2 Inch 3-Blade Propeller
Diameter: 2 inch
Pitch: 1.9 inch
Weight: 1.1gFPV Transmitter
Item Name: 5.8G 40CH 25mW 100mW VTX
Input Voltage: 5-6V
Operation Current (5.5V) : 310mA@25mW, 350mA@100mW
Frequency: 5.8G 40CH 5645-5945MHzFPV Camera
Item Name: Runcam Split Mini 2 Camera
Field of View(FOV): FPV FOV 130° / Recording FOV 165°
Video Resolution: 1080@60fps / 1080@30fps / 720@60fps
Video File Format: MOV
Image Resolution: 2 MP
TV Mode: NTSC (720*480) / PAL (720*576) Switchable
Interface : JST 1.0mm / UART
Max Micro SD Card Supported: 64G(need Class 6 or above, recommend Class 10 / UHS-I / UHS-II / UHS-III)
Hole Distance of Installation: 20*20mm
Dimensions: PCB 29*29mm / Lens Module 19*19mm
Power Input: DC 5-20V
Working Current: 650mA @5V / 270mA @12V
Weight: 12.5gReceiver
Without Receiver Version : No Receiver
Compatible DSM2/X Receiver Version: DSM2/X Receiver
Compatible Frsky Receiver Version: Frsky Receiver
Compatible Flysky Receiver Version: Flysky Receiver
Compatible Futaba Receiver Version: Futaba ReceiverPackage Included:
1x SPC K1 95mm FPV Racer
1x Battery
1x Strap -
INTRODUCTION
The new HBRC HB65S is a new 65mm brushless tinywhoop competitors with 0603 motors. This machine comes after the two excellent, extra fun URAV UV65/Eachine UK/US65. For the HBRC model, no crazybee F3 board with a builtin SPI receiver but we have a more classic F3 omnibus FC requiering an external micro-receiver. It means clearly some extra weight is added … but we have some 20 000Kv motors so faster than the 19000Kv for the US65 and 17000Kv for the UR65. For the FPV part, we have a 800TVL CMOS sensor coupled with a 16CH/25Mw VTX. Unfortunatly no smart audio here dislike the US65. Let’s check this new 65mm machine…. maybe the battle is not completly over vs the US65
BOX CONTENT
+ 1 x HBRC HB65S
+ 1 x FrSky Pro (D8) receiver (SBUS)
+ 1 x 260mAh LiHV battery
+ 1 x USB charger
+ 4 x Spare props (2 CW, 2 CCW)
+ 1 x Screwdriver
+ 1 x Rubber band
+ 1 x Prop remover wrench
+ 1 x Instruction manual (English)OVERVIEW
Same 65mm format but the HB65S frame is more similar to the UV65 model, more flexible able to absorb better crashes. The US65 frame is known to be more fragile.
-FRONT VIEW
Dislike the UR65/US65, the lens angle orientation is fixed to something around +15 degrees.-SIDE VIEW
A unique VTX button but easy to access is present. Since there are “only” 16CH, just short press on it to cycle among them. No Vband subsivisions.-UPPER VIEW
The 5.8G linear antenna is installed vertically via a rear tiny hole on the top canopy-BOTTOM VIEW
We have a Beecore F3 Omnibus board with builtin 5A BLheli_S 4-in-1 ESCThis FC accepts any SBUS/PPM receiver connexion and includes a Betaflight OSD compatible chip
Motors are directly plugs via 1.25mm micro-JST connector. Super easy for motor’s maintenance.
Unfortunatly the frame don’t offer a large enough battery tray. You must attache the LiPo via a rubber band addind some little weight at the end.
-WEIGHT
29.9g…. in total !!!! compared to the 27.2g for the UR65 and 28.5g. It’s a lot more for such size, close to 10% more vs the UR65.
With the OpenSky receiver directly soldered, 0.8g can be saved….
Motors and props
Probably the best ingredient in this bundle. 20 000Kv motors associated with quadriblades 31mm props.
They got 1mm hole section so directly usable for other US65/UR65 motors.
LiHv battery
The LiHV is a 260mAh model rated from 30C. The battery is at least 1cm more longer than the US65 model…. so the 260mAh seems more “realistic”.
Be aware, versus multiple crashes, the pH 2.0 connector can be damated.
Camera module
The same FPV solution as for the HB68. A 150 deg FOV camera with a 800TVL CMOS sensor.
For the VTX, it’s a 16CH module, 4 channels of the classic 4 Vbands. No smart audio controls
Disassembling
If the AIO module is directly soldered, the SBUS receiver enjoys a dedicaced 3position connector for a plug & bind operation.
As the provided FrSky Pro D8 receiver was broken out of the box, I had to install a more compact OpenSky D8 receiver. I soldered directly the receiver on the main SBUS Pads to same some light weight.
UNBOXING, ANALYSIS, CONFIGURATION AND DEMO FLIGHT
The HB65S comes with an old version of Betaflight 3.2 not supporting ESC beacon and flip over crash features. For the BLheli_S firmware, 16.6 is installed so it need also an upgrade to support the last quoted feature. In term of configuration, no specific optiization have been done except for the SBUS receiver pre-configuration. It’s strongly advised to update both Betaflight & BLheli_S firmwares.
When the battery is attached, the machine is still more or less leveled. Now when the throttle is applied… the answer is more linear versus the US65. You can feel more thrust at lower throttle inputs. At the extremity, punch out are really comparable as for UR65/US65… Not superior but not inferior despite the 2.5 extra grams. The other good news is about the quadriblade props…. they offer jellofree conditions dislike the unbalanced triblades edition associated with the UR65/US65. The FPV camera is correct for a CMOS sensor with vivid colors but the FPV range is clearly inferior to the US65 ‘ VTX performances. Statics comes after crossing only 2 walls. Whatever the machine is stable, precize indoors. Notice few times, a prop has been pop out…. Probably a small drop of glue can be an option to apply. In term of power the machine is acro compatible, climb fast enough for loops & rolls…. but expect some prop’s wash at the end of the operation. With moderate winds, the machine handles well outdoors condition. The battery offers good discharge capacity and expect about 3min of flight time with.
CONCLUSIONS
No major drawbacks can be noticed with this HB65S except to be more expensive, with less features (no smart audio), with less FPV range, more heavier than the UR65/US65…. In other words, there is no magic ingredient in order to prefer the HB65S versus these two competitors. Maybe the HB65S just comes few months too late.
PROS
+ Good and powerfull 20000Kv motors
+ Super stable, no jello out of the box
+ Good 260mAh LiHV battery
+ 3min 15s of flight time
+ OSDCONS
– More expensive than the Eachine US65
– No real battery tray
– 2.5g more heavier than UV65
– No RSSI & telemetry for the FrSky receiver
– No smart audio
– FPV range shorter than the US65’s one
– Old Betaflight OS installed (no ESC Beacon & Flip over crash features available out of the box)This quadcopter have been courtesy provided by Banggood in order to make a fair and not biased review. I would like to thank them for this attitude.
You can find it actually for 119USD at https://www.banggood.com/HB65S-65mm-1S-Brushless-RC-FPV-Racing-Drone-PNP-BNF-F3-OSD-25mW-800TVL-0603-20000KV-Motor-p-1333638.html -
INTRODUCTION
After the excellent Happymodel Snapper6, and the even more better URAV UV65, here is probably the ultimate 65mm microbrushless FPV machine, i.e. the Eachine US/UK65. One more time, it’s based at 95% with the same incredients: same Crazybee F3 board, same bundle… but now the frame, the KV of the 0603 motors and the AIO FPV Module are differents. For the US65, we have a machine a 1.2g heavier structure but with faster 0603 motors: 19000Kv vs 17000kv. The crazybee integrates now a 6A 4-in-1 ESC BLheli_S/Dshot 600 compatible, a builtin 2.4G FrSky (D8/D16) or Flysky (AFHDS-2A) receiver. The FrSky export the Vbat & RSSI via telemetry… For both RSSI is also sent for the OSD directly via SPI connexion. The AIO is also updated: still a good 700TVL CMOS model with a builtin 48ch/25mW VTX but now with Smart Audio connection to change the Vfreq/Vband via the OSD, ideal for indoors competition with several machines. Let’s discover the Eachine US65. From now since, I will make shorter the written review part to concentrate elements more in the video and the conclusion parts.
BOX CONTENT
+ 1 x Eachine US65
+ 3 x 250mAh 1S LiHV with JST pH2.0
+ 1 x USB parallel charger
+ 4 x Spare props (2 CW, 2 CCW)
+ 1 x Screwdriver
+ 1 x Wrench prop remover
+ 2 x Spare rubber bandsFor the Eachine version, no instruction manual…. Luckely it’s almost the same machine than the URAV UV65.
OVERVIEW
url=https://postimages.org/]
[/url]1.2g more heavier ….. Will this extra weight will be an handicap for the 19000Kv motors ?
The green wire is the smart audio connexion directly done to a pad of the F3 MCU. I guess the crazybee board will be updated soon with a new direct pad to connect smart audio more easily.
UNBOXING, ANALYSIS, CONFIGURATION AND DEMO FLIGHT
By default with the FrSky edition, the selected protocol is the LBT/non-EU D16 so called FrSky_X in betaflight. If your favorite taranis/openTX radio is not flashed with the non-EU firmware, you can select instead the FrSky_D, i.e. the D8 mode. It will work whatever the EU or non-EU firmware. For both the D16 & D8, good news, telemetry informations are also sent back to the radio. Important information: since the receiver is directly connected with the F3 MCU via SPI, you don’t have to select an AUX channel for the RSSI in the receiver tab. If you select the AUX4 (D8) or AUX12 (D16) as usual with a SBUS connexion, paradoxally the RSSI information won’t be here anymore.
The bind procedure is a little bit unsual for a FrSky receiver. No need to press & hold the micro bind button while powering. Here … first power the machine then only short press on the bind button. The green light will continue to blink slowly…. so no real feedback to know if the binding procedure was correctly done. You will need to repower the machine to complete the binding operation.
The machines comes with betaflight 3.4 (ESC buzzer, flip over crash ready) and …. with a working smart-audio protocol. If the smart-audio works flawless out the box… the ESC buzzer is not preconfigured in betaflight…. It’s a minor detail…. but they could do it from factory. Luckely it’s only a question of software turning.
As for the Snapper6 and the UR65, the voltage threshold are set too high…. and after a couple of seconds you will see “low voltage” displayed on the screen. A solution is too decrease the two voltages and also to remove from the OSD informations the “warning” element.
The new AIO module for a CMOS sensor offer great vivid colors and for a 25mW module the FPV range is just great despite a basic linear antenna. You can reach up to 200m… in a open wide space. It’s not bad at all. The Vband/Vfreq selection from OSD is a big plus…
Ok … let’s now speak about probably the more important question. Are the 19000Kv boosting performances versus the 17000Kv of the UR65…. and the answer is no….. In fact the 1.2g extra grams kills the potential gain. But don’t worry, the US65 is at the end as powerfull as the UR65… so it’s already a super great machine much more powerfull than any 65mm brushed machines. The US65 is fantastic little indoors machine going through any tiny spaces. For outdoors, the machine can handle pretty well moderate wind. The powerlift are strong enough for acro figures even powerloop….
This is a super fun little machine ideal for winter times. Flight times are in average of 3min with indoors application and down to 2min with more agressive acro outdoors flights.As for the two other models, the FPV feedback presents some little jello due to the three blades props, highly unbalanced. If you replace them with some four blades (Eachine E010/E011) models, the machine will fly on air-rails.
Last point, the throttle answer is a bit strange…. a lot of power will be here when the stick will be above 85%. It’s advised to apply a non-linear curve on your radio or betaflight to have a more classic throttle response.
CONCLUSIONS
The Eachine US/UK65 is probably currently the best 65mm machine. The new AIO smart audio module deserves the buy versus the UR65. The US65 is powerfull… fun, easy fo fly, ultra light and absoluptly not dangerous to anyone/anything. It’s clearly one of my favorite machine. How to improve it ? Swap the top canopy for the UR65 model or you can even find some even more lighter. You can also install the new 22000Kv 0603 brushless motors. Finally some >40C batteries are a minimum to enjoy all the power of this machine. It’s an highly recommanded machine already a hit. More currently it’s sold about 70USD !!!!! What else ?
PROS
+ 0603/19000Kv motors strong enough for acro
+ F3 w/OSD
+ Well tuned out of the box
+ No drift in angle mode
+ FrSky SPI receiver w/ RSSI for OSD & Telemetry
+ Good AIO module
+ Smart Audio
+ Uptiltable camera
+ BF 3.4/BLheli_s 16.7 pre-flashed
+ ~3min of flight time
+ Good LiHV battery
+ SilentCONS
– Not more powerfull than the UR65 (due to the 1.2 extra gram)
– Micro bind button hard to access/press
– ESC buzzing & flip over crash not pre-configured out of the box
– Motorÿs screws easy to loose. Need to be thread locked
– Little jello due to unbalanced propsThis quadcopter have been courtesy provided by Banggood in order to make a fair and not biased review. I would like to thank them for this attitude.
You can find it actually for 79USD at https://www.banggood.com/Eachine-US65-UK65-65mm-Whoop-FPV-Racing-Drone-BNF-Crazybee-F3-Flight-Controller-OSD-6A-Blheli_S-ESC-p-1339561.html -
The runcam split mini was the first camera combo able to record a 1080p@60 video flux while broadcasting the FPV signal with low latency. This module was based on two daughter boards. Later, caddx delivered the turtle, a direct one board based competitor. Today Runcam introduces the second version of the split mini: https://www.banggood.com/RunCam-Split-Mini-2-FOV-130-Degree-1080P60fps-HD-Recording-WDR-FPV-Camera-NTSCPAL-Switchable-p-1344675.html
The main caracteristics remain the same: 1080p@60fps, 40ms low latency FPV camera with two different FOV. The big news now the solutions weights only 12.5 so close to be twice more lighter. For sure it will be the new “hype” FPV module…RunCam Split Mini 2 FOV 130 Degree 1080P/60fps HD Recording & WDR FPV Camera NTSC/PAL Switchable
Description:
Brand name: RunCam
Item number: Split Mini 2
Field of View(FOV): FPV FOV 130° / Recording FOV 165°
Video Resolution: 1080@60fps / 1080@30fps / 720@60fps
Video File Format: MOV
Image Resolution: 2 MP
TV Mode: NTSC (720*480) / PAL (720*576) Switchable
Interface : micro USB / UART
Max Micro SD Card Supported: 64G(need Class 6 or above, recommend Class 10 / UHS-I / UHS-II / UHS-III)
Hole Distance of Installation: 20*20mm
Dimensions: PCB 29*29mm / Lens Module 19*19mm
Power Input: DC 5-20V
Working Current: 650mA @5V / 270mA @12V
Weight: 12.5gFeatures:
* 1080P/60fps HD recording & WDR FPV camera
* Power-off protection for video files
* Ultra light weight (12.5g)
* Low latency TV-OUT (40ms)
* Wide voltage (5-20V)
* Anti-drop SD cardRunCam Split Mini 2 FPV Camera Manual, click here
Package included:
1x RunCam Split Mini 2 FPV Camera
1x Metal Cover
1x Micro-to-full-size mounting bracket
1x Set of M2 screws
1x 3PIN 1.25 JST Silicone Cable(female)
1x 3PIN 1.25 JST Silicone Cable(male)
1x 3PIN 1.0 JST Silicone Cable
1x 1x Manual -
The URAV UR65 was my last best personal choice and represents the best combinaison of electronic ingredient to produce a real powerfull 65mm brushless tinywhoop machine. Here is a new slight variant durectly branded by Eachine, the US65/UK65: https://www.banggood.com/Eachine-US65-UK65-65mm-Whoop-FPV-Racing-Drone-BNF-Crazybee-F3-Flight-Controller-OSD-6A-Blheli_S-ESC-p-1339561.html
It’s more less excactly the same elements, i.e. the great Crazybee F3 but now directly flashed with Betaflight 3.4. The ESC are rated 6A and also flashed with a turtle/esc buzzer compatible firmware. This new model now integrates some 19000Kv SE 0603 motors… so 2000Kv faster versus the UR65. Another advantage versus the UR65, the 700TVL AIO camera is now Smart Audio compatible… so all Vfreq, Vband selection can be done directly from the OSD. As for the other model, the Crazybee integrates two choice of SPI builtin receiver. A FrSky D8/D16 and a Flysky AFHDS-2A. Be aware, if your FrSky radio is flashed with the EU firmware…. it will probably required to flash more the international version. The US65/UK65 is proposed in a bundle with three LiHV 260 mAh batteries with 40C of discharge rate. This machine will be probably a future hit … and is slightly cheaper than the UR65.Specifications:
Brand Name: EACHINE
Mode Name: US65/UK65
Item Name: 1S 65mm Brushless Whoop racing drone BNF
Wheelbase: 65mm
Size: 81mm*81mm*36mm
Weight: 21.5g(without battery)
Weight:28g(with Original 250mah lipo battery)SE0603 KV19000 Motor Mode: SE0603 KV19000
Configu-ration:9N12P
Stator Diamter:6mm
Stator Length:3mm
Shaft Diameter:Φ0.8mm
Motor Dimension(Dia.*Len):Φ9mm*15.5mm
Weight(g):1.8g
No.of Cells(Lipo):1S
Flight controller
Firmware: Betaflight_3.4.0_CrazybeeBetaflight target:
CRAZYBEEF3FR(Frsky version)
CRAZYBEEF3FS(Flysky version)
MCU: STM32F303CCT6 (72MHZ, 256K FLASH)
Sensor: MPU-6000(SPI connection)
Board size: 28.5 * 28.5MM
Board weight: 3.5 g
Power supply: 1S battery input (DC 3.5-4.35V)
Built-in 6A(each) Blheli_S 4in1 ESC Dshot600 ready
Built-in Frsky receiver with telemetry(D8/D16 switchable)
Built-in Betaflight OSD(SPI Control)
Built-in Current meter Max 14A
Built-in 5V 0.8A BEC with LC filter
Built-in voltage detection
BLHELI_S pass-through Ready
Heading LED ReadyOnboard 4in1 6A ESC Power supply: 1S LiPo/LiPo HV (4.2v/4.35v)
Current: 6A continuous peak 7A (3 seconds)
Support BLHeliSuite programmable
Factory firmware: O_L_5_REV16_6.HEX
Default protocol: DSHOT600
Frsky receiver Version SPI BUS receiver
Frsky D8/D16 switchable
Compatible both D8 and D16 transmitter
Channels: 8ch or 16ch
Failsafe support
No ground interference ( Transmitter and receiver 1 m from the ground): 300m
Flysky receiver Version SPI BUS receiver
Protocol: AFHDS and AFHDS-2A Switchable
Channels: 8ch(AFHDS) or 14ch(AFHDS-2A)
No ground interference ( Transmitter and receiver 1 m from the ground): 300m
Failsafe supportAIO Camera&VTX Output power: 25mw
Frequency: 48CH
Input voltage: 3.3V 5.5V
Current consumption: 300mA(type)
Camera resolution: 700TVL
Field of view: 120°
Smartaudio ready
Video Format: NTSC
Antenna: RG178 antenna
Frequency: 5.8GHz 6 bands 48 channels
With Raceband: 5474 5945 MHZ
Size: 13.9″12.0mm ( L*W )
Weight: 3gLipo Battery Capacity:250mAh
Voltage:3.8v
Continuous Discharge Rate: 40C
Instantaneous discharge rate: 80C
Size: 60mmx18mmx7mm
Weight: 6.5g
Connector: PH2.0Features:
Betaflight support , multi flight mode: ACRO/AIR/ANGLE
Powerful Brushless motor and Smooth ESC
Betaflight OSD support ,easy to get RSSI , Voltage and other info from your goggles
Adjust the settings and the PID of the flight controller via OSD
Frsky version support both D8 and D16 transmitter
Full telemetry function ready
Head lights ready
Camera angle adjustable
Real Bind and Fly versionPackage Included:
1 x 65mm Brushless whoop Frame (US or UK to choose)
1 x Crazybee F3 FC (Frsky and Flysky option)
4 x SE0603 KV19000 Motor
1 x 31mm propeller(4cw+4ccw)
1 x AIO Camera & VTX with smartaudio
3 x 3.8v 250mah 40C/80C battery
1 x 1S06 6 way Lipo/LIHV charger
1 x Propeller disassemble tool
1 x Screwdriver -
I don’t announce often for brushed quadcopters because in general there are only very slight improvements versus the billion of models introduced in the market permanently. Here is a new one able to FPV in 1080p with a wide angle (seems about 120 degrees according to the photos). Ok it’s not new… but this one also, i.e. the Cheerson CX39: https://www.banggood.com/Cheerson-CX39-WIFI-FPV-With-1080P-Camera-Altitude-Hold-Mode-Voice-Control-RC-Drone-Quadcopter-RTF-p-1339075.html can record inboard the native 1080p@30fps source…. That’s a good forward step. There is a builtin GPS module offering classic advanced modes such as RTH or orbit mode. More, the CX39 offers the possibility to lunch some actions via some voice commands. Be aware, the FPV signal is broadcasted in the 5.8G WiFi band… so no all (europeean) android will be comptible with (some 5G/5.8G channels are not opened for europe and in general chinese quadcopters open only the CN/US channels). The machine is a 230g brushed geared 1S one with a flight time advertized up to 12min. Of course with this kind of machine… it’s strongly advised to stock in advance some spare motors as soon as tbey are available. Wait & See.
Description:
Brand name: Cheerson
Item name: CX39 RC Quadcopter
Item No.:CX39
Color:Red Blue; Black Orange.
Frequency: 2.4GHz
Channel: 4CH
Gyro: 6 Axis
Quadcopter Size: 31*32*9cm
Blade diameter: 14cm
Quadcopter Weight: 230g(with battery)
Quadcopter Battery: 7.4V 900mAh (included)
Quadcopter Battery Charging Time:150mins
Flight Times:12mins
Transmitter Battery: 3.7V 2200mAh (not included)
Remote control battery life:about 80mins
Transmitter Charging Time: 150mins
Flight Distance: 300-500m
Flight speed: <30KM/h Flight mode: headless mode, GPS mode Flight environment: indoor, outdoor R/C Distance:about 100m Wifi 5G R/C Distance:250 meters Camera: 1080P/720P (Adjustable) Video resolution: 1080×1920
Frame rate: 30 frames / sec
Camera angle: manual
Recording format: mp4
Photo format: jpgFeatures:
– Forward and backward, left fly, right fly, left rotation, right rotation, one-button takeoff, one-button landing,
– With backhaul function, the phone displays the height of the aircraft, the number of satellites, heading, horizontal speed, vertical speed and current battery level, etc
– The aircraft has a low voltage 30 seconds automatic alarm and automatic landing function to further improve the safety of the flight;
– Large capacity smart battery with battery indicator for easy plug-in battery structure, longer battery life and faster battery installation;
– With one-button return and out of control return function, making over-the-horizon flight safer;
– The aircraft has three speeds: high, medium and low speed freely switchable to adapt to different flight environments;
– The concept of camera and video transmission integration, camera video, simpler shape, more convenient operation;
– Turn on the GPS mode hotspot surround function to control the surround radius;
– One-click 360-degree panoramic video, 5G WIFI for iPhone 5 and above, not for Android;
– The aircraft inserts the SD memory card to save the video as 1080P, the mobile phone 5G WIFI saves the video as 720P, and the receiving range is about 200 meters.
– The latest mobile phone 5G WIFI remote control operation, FPV screen real-time transmission, experience the first flight person called vision.
– The latest voice control function can perform a variety of flight actions through the APP voice command aircraft, and the voice interaction is fun and fun;
– Needn’t judge the head position thanks to the headless mode function
– The camera angle can be adjusted manually;Function: Up/down, Forward/backward,Turn left/right, Sideward flight, LED Light, Headless Mode, 3-level flight speed;One Key Automatic Return,high hold mode;WIFI FPV;
Package Included:
1 x CX39 Aircraft
1 x Transmitter
1 x 7.4V 900mAh Battery
4 x Propeller
4 x Protection Guard
1 x USB Charging Cable
6 x Screw
1 x Screwdriver
1 x English Manual -
Want a 3″ FPV machine with a builtin Runcam Split Mini able to record 1080p@60fps videos simultaneously to broadcast the FPV signal ?. Here is the iFlight iH3 Pro: https://www.banggood.com/IFlight-iH3-Pro-3-inch-FPV-Racing-Drone-BNF-F4-25A-4-in-1-ESC-Flytower-48CH-025100200mW-VTX-p-1338220.html
Of course other electronic elements are also updated. We have a F4 flght controller able to run up to 32Khz for even better stabilizations. The 4-in-1 ESC are rated 25A (peak 30A). No information if they are BLheli32 w/ Dshot 1200 or classic BLheli_S/Dshot600. Motors are strong, 1408/4100Kv main probably 4S compatible. Good news the frame can accept up to 16xx size motors…. The frame offers 3mm arms and guaranty no props occlusion for the video. A buzzer is installed. I really hope dislike the spcmaker s125, the connexion between the split mini and the fc will be complete, i.e. with also the possibility to trigger recording from the radio. Two BNF versions are proposed: one FrSky D16 with a XM+ receiver and one FlySky with a compatible AFHDS-2A receiver. The machine weights 166g without battery. Expect to reach 200-210g with a 550mAh 4S LiPo. The machine comes with a XT30 connector by default. I hope to grab one for a review. Wait & See.Specification:
Brand name: iFlight
Item name: iH3 Pro FPV Racing Drone
Wheelbase: 142.5mm
Frame weight: 39g
Bottom plate thickness: 3mm
Top plate thickness: 2mm
Vertical side plates thickness: 2mm
Vertical side plates width: 19mm
Standoffs mounting distance: 22mm
Flight control mounting holes size: 20*20mm
Supported Motor:11XX/13XX/14XX/16XX
Supported propeller: Max 3 inch– iH3 Frame
– 32K mini F4 + 25A 4 in 1 ESC Flight Tower Stack
– iFlight Tachyon T1408 4100KV
– iFlight Nazgul T3061 Propeller Crystal Red
– RunCam Split Mini Camera
– Force Mini 5.8G Transmitter
– FOXEER 5.8G Antenna SMA Red
– 5V Low Voltage Alarm Buzzer with LED Light
– Battery straps Red
– Double-sided attachment tape
– XT30 Female to JST Male Plug
– 18 AWG Wire 70mm w/ Amass XT30 Male
– 1A LC Power Filter
– Frsky XM+/Flysky A8S ReceiverDescriptions:
iFlight iH3 BNF drone is a latest FPV aerial filming drone. It redefines aerial filming by combining fpv racing and aerial filming. It features front & back twin-towers structure, which completely solve the problem of ‘High Tower’. 2mm thickness vertical side plates can protect the camera from damage even it’s camera front protraction design.It ensures there won’t be propellers in view when using Mini HD recording camera. There is a larger space on the top plate for you to choose different types of battery. The drone comes with Runcam Split mini which makes FPV and recording camera 2 in 1.No extra Gopro, SQ11 or Hawkeye Firefly micro action cam needed which can reduce the drone weight effectively.
Features:
* Front & back twin-towers structure
* Vertical side plates camera protection
* No propellers in view when HD recording
* Large room on the top plate for different battery choice
* 9mm&12mm motor pattern, compatible with 11XX-16XX motorsPackage Included:
1 x iH3 Pro 3 inch FPV Racing Drone -
As you probably known, the introduction of 0603 brushless motors was the solution for 65mm brushless tinywhoop machine and probably the best current model is the URAV UR65…. IMHO, the best available machine actually. But HBRC will introduce soon the same type of machine with the HB65S: https://www.banggood.com/HB65S-65mm-1S-Brushless-RC-FPV-Racing-Drone-PNP-BNF-F3-OSD-25mW-800TVL-0603-20000KV-Motor-p-1333638.html
The main novelty is the integration of 0603/20000Kv motors offering 24g of thrust each !!!. So close to 3 extra grams per motors versus the 16000Kv variant for the UR65. In the other hand the HB65S is annonced 1g more heavier than the UR65. For the HB65S, the flight controller is no more the excellent crazybee model. Here we have a F3 based board with a builtin OSD and a 5A 1S ESC 4-in-1 module (Dshot 600 compatible). The AIO module is based on a 800TVL CMOS camera coupled with a 48CH 25mW VTX. The HB65S can be found in PNP variant or in four different BNF configurations: DSM2/X, FlySly AFHDS-2A, FrSky D8 and Futaba SFHSS. For this later is also mentionned D16… Does it mean it also supporting the FrSky D16 ? It’s not impossible since FrSky and Futaba protocols are based both on the CC2500 RFchip. The first open question will concern the presence of the RSSI for the FrSky D8 variant. But the more important question is about the efficiency of the provided 260mAh LiHV 30C batteries. 20000Kv are known to pull a lot of current under 100% load… and if the battery is not strong enough, you may meet some brownout at full throtlle… or damage very fast this model of LiHV batteries… Wait & See as usual.Specification:
Item name: HB65S 65mm 1S FPV racing drone
Wheelbase: 65mm
Frame structure: true X
Weight: about 22g (without battery)
Recommed flight weight: <30g (with battery) Flight time: 2-4mins (260mAh)
Flight controller: F3, built-in OSD
ESC: 1S 5A 4in1 Dshot
Motor: 0603 20000KV
Propeller: 31mm 4-blade 1.0mm mounting hole (2pairs: orange)
VTX+camera: 25mW 800TVL 150°
battery: 1S 260mAh 30C HV
Receiver: without receiver/ DSMX/ FrSky D8/ FS-RX2A/ SFHSS+D16 receiver(option)F3 OSD flight controller:
Item name: BF3-OSD-1S
Board size: 28*28mm
Mounting hole: 36*36mm, 2.5mm hole diameter
Processor: STM32F303CCT6 (72MHZ, 256K FLASH)
Sensor: SPI sensor MPU-6000
Firmware: Betaflight_3.2.x_OMNIBUS
Power supply: 1S
Built-in 5V/0.5A BEC
Built-in BF OSD
Built-in LC filter
Support programmable LED
Supports BLheli suite ESC programme
With buzzer portSBUS or DSM receiver input, please configurate RX3 as input interface.
DSM receiver powered from 3.3V
SBUS and PPM from 5V5A 4in1 Dshot ESC:
Item name: BS5A
Size: 28*28mm
Mounting hole: 36*36mm, 2.5mm hole diameter
Firmware: BLHeli_S 16.6
Continuous current: 5A
Burst current: 6A (5s)
Power supply: 1S lipo(3.3-4.35V)
Support Dshot150/300/600, PWM, Oneshot125, Multishot0603 20000KV motor:
Item name: HBFPV 0603
KV: 20000KV
Stator diameter: 6mm
Stator height: 3mm
Shaft diameter: 1mm
Working voltage: 1S(3.0-4.35V)
Max thrust: 24g
Weight: 1.6gVTX+camera:
Item name: 199C
Output power: 25mW
Lens: HD800TVL/FOV: 150°
Channel: 16CH/ 48CH(button switching)
Antenna: hose antennaBattery:
Capacity: 260mAh
Voltage: 1S, 3.8-4.35V(HV)
Continuous Discharge Rate: 30C/60C
Connector: PH2.0-2P
Weight: about 6.9-7gPackage included:
PNP version:
1x HB65S frame kit
1x 0603 20000KV motor
1x F3 OSD+5A 4in1 fytower
1x 25mW AIO camera VTX
1x 260mAh 30C HV battery
2x pairs 31mm 4-blade orange propeller
1x 1S HV charger
1x mini screwdriver
1x propeller pullerBNF version:
1x HB65S frame kit
1x 0603 20000KV motor
1x F3 OSD+5A 4in1 fytower
1x 25mW AIO camera VTX
1x 260mAh 30C HV battery
1x DSMX/ FrSky D8/ FS-RX2A/ SFHSS+D16 receiver(option)
2x pairs 31mm 4-blade orange propeller
1x 1S HV charger
1x mini screwdriver
1x propeller puller -
INTRODUCTION
The Eachine EX2Mini is the direct rebranding of the MJX B2mini… a compact (<=220mm) brushless solution ready to fly, i.e. a nobrainer machine for beginners who don't want to tune anything in betaflight. The machine is fully plastic based, equiped of 1306/2750Kv motors, a proprietary flight controller untunable in combo with a basic 4-in-1 ESC board. Three versions are proposed: i) one basic with the flyer standalone, ii) the second comes with the FPV 24CH/25MW AIO module pre-installed and the iii) comes with a full FPV solution including a basic FPV monitor and large mask goggles. I will review the second model.
BOX CONTENT
+ 1 x Eachine EX2mini
+ 1 x 850Mah proprietary 2S LiPo
+ 1 x Transmitter (using 4xAA batteries not included)
+ 1 x USB charging cable
+ 4 x Spare props (2 CW, 2 CCW)
+ 4 x Prop guards
+ 1 X Prop remover wrench
+ 1 x Screwdriver
+ 1 x Instruction manual (English)A good thing, four prop guards are included as well as four spare props.
OVERVIEW
The machine is a 100% direct rebranding of the MJX product. The EX2/B2 mini comes after the surprizing sucess of the Bugs B3… their first RTF brushless machine. Here the EX2 is more lighter and compact of course, a 220mm machine with 3″ props. As the Bugs3, the top canopy structure is very easy to extract thanks to the smart clip system. No real risk to loose midflight this part. It’s well designed.
-FRONT VIEW
The machine got four nylon based landing skid… more solid than the rest of the plastic struture. The general body is full plastic based. Flexible enough to handle moderate crash easily on soft/earth surfaces but don’t expect miracle at full speed against concrete.-REAR VIEW
The EX2 dislike the Bugs3 with a EC2 connector got a proprieatary battery with a five pads connector.The battery extraction requieres a bit some force….. More I regret the absence of small and simple power switch….
-UPPER VIEW
-BOTTOM VIEW
Four strong lights are located bottom ideal for LOS only flight applications. Good news, you can turn off them via a dedicated radio button.
-WEIGHT
About 180g with the battery…. so no problem for the 250g limitation.
Motors and props
The 1306 motos announced to be 2750Kv model.
Be aware, you need props with a thread of 4mm.
3″ bull noze props … efficient and silent in practice.
Larger props can be installed if required
LiPo
A 850Mah 2S LiPo model with 45C as discharge rate… Punch out are correct with….. and you can expect close to 9min of flight time with. Not so bad.
Use the special adaptor between the USB charger and the battery. A red light will flash when charging and will be off when it’s done. Expect more than 1h20 for a full charge.
Camera module
The AIO module is directly installed into the machine. It’s a basic 600TVL CMOS camera in NTSC only format with a builtin 24CH/25mW VTX… So no racerband supported…. The camera is powered via a 2p JST-ph connector… so it’s easy to install another module. In theory the camera can uptilted with a fixed 25-30 degrees angle….
The problem is with such angle, the field of view is partially occulted by the top canopy structure …. Weird ….
A unique button to control the AIO module. Short press to cycle withing the eight Vfreq inside the current selected band while long press permits to cycle between the four supported Vbands.
Disassembling
As expected, no hidden USB port for a potential connexion on a PC… so no possibility to tune some flight parameters. But…there is also a buzzer ringing in out of range and low battery conditions.
The 2.4G antenna is jailed into the front left arm.
Transmitter
A rounded chassis with four top parnel bouttons… two fake antennas. The sticks are basic…. with weak spring feedbacks.
The major novelty is the left vertical trim button used to select angle (1) and acro(2). The main constraint, the flight mode must be selected before to turn on both the EX2mini and the transmitter….
4xAA batteries are required to feed the transmitter. NiMh model are working with. The RF protocol is based on the A7105 RFchip… like the FlySky ADHDS/AFHDS-2A protocols. In practice, the control range is pretty good….
The L1 button engages 360 flips when the EX2 mini flies in angle mode only.
UNBOXING, ANALYSYS AND DEMO FLIGHT
Even if the machine is a pure RTF machine, you will need first to bind togather the transmitter with machine: turn on the quad then press and hold the top red button while powering the transmitter.
The first contact at least in angle (stablized) mode is good as the former MJX models…. it flies smootly… beautifully… By default the machine is in H (high speed) mode… The machine is fast but far to reach the top speed of any 3S FPV 3″ racers. It’s unfortunatly in practice confirmed that you can cycle mid-flight between angle and acro…. You will need first to land…. turn off everything…. It’s weird…. I guess the flight mode is transmitted during the binding sequence…. In angle mode, 360 automatic flip are super easy like for a small brushed quadcopters. When the acro mode is active…. first thing … when you push left or right the right stick for a roll…. the machine don’t roll instantaneously…. You will need to wait close to 1s to engage the mouvement….. definitively flip and roll rates are too slow in acro …. :(…. and no possibility to tune them.
Well at least there is an acro mode but with such rates …. forget to transform the EX2mini into a freestyle machine. The machine is also not eanough power for this. The main problems IHMO comes from the AIO FPV module…. Both the color rendition and the light sensitivity are poor …. Really disapointing even for a CMOS sensor.. More the Field of View is really narrow…. less than 90 degrees… Really incompatible for most FPV applications except in case of super wide open spaces…. To resume this module is crap… luckely another one can be easily installed. In term of advanced features associated with the EX2 protocol, the radio buzz when the quad battery is low or when the machine is close to be in out of range condition or when the batteries of transmitter are low. This feature is really in absence of real telemetry displayed informations. Probably these informations will be here if the machine is flown with compatible DeviationTX radio and the special build supporting the MJX protocol (https://www.deviationtx.com/forum/protocol-development/6696-mjx-bugs-3?start=340#70061)CONCLUSIONS
I got a mixed feeling with this machine…. If the EX2mini is super compact RTF machine with a pretty angle mode… the acro is far to be optimized and the default FPV camera offers pretty poor performances…. incompatible with fast FPV session in low riding conditions for example. I recommand more this machine in basic edition without any FPV addings and install instead a real efficient AIO FPV module.
PROS
+ Great angle mode
+ Compact and Ready to fly
+ Brushless machine for beginners
+ Telemetry feedback (low battery and out of RC range)
+ 360 flip for a brusless machine
+ Protocol Deviated (Mostly)CONS
– Full plastic based
– Proprietary battery
– No possibility to cycle mid-flight between angle and acro modes
– Slow pitch & low rates for acro mode (hard to flip and roll fast)
– Poor light sensitivity camera performances
– Narrow Field Of View incompatible with most of FPV practices
– No possibility to uptilt the camera without occlusion introduction due to the top canopy structure
– No possibility to tune any flight parametersThis quadcopter have been courtesy provided by Banggood in order to make a fair and not biased review. I would like to thank them for this attitude.
You can find it actually for 100USD at https://www.banggood.com/Eachine-EX2mini-Brushless-5_8G-FPV-Camera-With-Angle-Mode-Acro-Mode-RC-Drone-Quadcopter-RTF-p-1301880.html -
Intel is currently working in partnership with the China Foundation for Cultural Heritage Conservation (CWCHF) to help restore the Jiankou wall, one of the most famous stretches of the Great Wall of China.
The Jiankou wall spans 12 miles and is rapidly decaying.
Due to its location, covering high mountain peaks and steep cliffs, this section of the Great Wall has never received restoration work. In fact, many parts of the Great Wall have never been restored, since work in the treacherous areas where the wall is located is both dangerous and expensive using traditional methods—but by collecting aerial data with drones, Intel will be able to expedite the collection of key information on where restoration efforts should be focused.
Using their Falcon 8+ drone, Intel will collect data on the Jiankou wall, which will be stitched together to create detailed 3D models for the CWCHF. Intel will also provide a plan for how to use the data collected to restore the damaged sections of the wall.
Drones are very capable platforms that can be used for novel applications beyond just the commercial roles that they were designed for.
– Anil Nanduri, Head of the Drone Group at Intel
Last year at InterDrone, Intel’s CEO Brian Krzanich used the phrase “data is the new oil” when speaking just before a demo of the Falcon 8+ and Intel’s Insights platform.
In the demo, the Falcon 8+ flew an automated path to survey a fake wall that had been erected for the purposes of the demonstration. The aerial data collected was then analyzed by the Insights platform, and problem areas where work was needed were automatically identified.
Intel will use a similar approach with their work on the Great Wall, using an A.I. algorithm to automatically review the thousands of images that will be collected and identify those areas that need attention.
But their insights will go beyond simply identifying structural flaws. According to Intel, by using one of their Xeon processors they will be able to provide guidelines on the precise work that needs to be done to correct the damage found to the wall, down to the exact amount of bricks needed to make a given repair.
Intel plans to capture over 10,000 hi-res aerial images as part of their restoration efforts, which will provide invaluable information for conservation teams and expedite efforts to fix damaged areas of the wall.
Intel’s Drones for Good Efforts
The Great Wall restoration project is part of Intel’s “Tech for Good” initiative, which has included some pretty fascinating projects, including two wildlife conservation projects.
One of these projects was an arctic expedition to track and document polar bears, in which Intel teamed up with renowned wildlife photographer and conservationist Ole Jørgen Liodden.
Given how dangerous they are, and the vast areas they cover, the ideal method for tracking polar bears is from the air. But using a helicopter is loud, invasive, and cost-prohibitive—and this is where Intel’s Falcon 8+ proved helpful for Liodden, who used it throughout the expedition to take pictures and video of polar bears.
The second conservationist project Intel has supported was in using drones to track and document whales—and to help collect their snot.
Project SnotBot is an initiative that uses drones to collect whale blow, also called snot, exhaled when whales surface, which contains vital data for researchers, and Intel teamed up with them to support their research and conservation efforts.
Intel helped Project Snotbot by using machine learning technology to improve their data analysis by running algorithms that can identify a particular whale and assess its health in real time, regardless of the presence of complicating factors such as the whale’s unpredictable movements or limited ocean visibility.
Let us know what you think of Intel’s drones for good efforts in this thread on the UAV Coach community forum.
The post Intel Expands “Drones for Good” Efforts with Work to Restore the Great Wall of China appeared first on UAV Coach.
-
An excellent way to increase your knowledge within the drone industry is to attend a trade show or conference. As the drone industry expands, conferences continue to become available in more locations across the world. One such event is The Commercial UAV Show set to take place in London, England, November 14-15, 2018.
The 2018 Commercial UAV Show
The Commercial UAV Show is Europe’s largest event for commercial UAV professionals, bringing together over 3,000 people to discuss industry developments, their challenges, and how to thrive in this dynamic industry. Celebrating its 5th year in 2018, The Commercial UAV Show is established as a world-class conference focused on the progression of the UAV industry; and a technology exhibition showcasing the latest hardware and software innovations from the mega tech companies to the latest start-ups.
Ticket Discounts for UAV Coach Readers
As a media partner of The Commercial UAV Show, we are delighted to offer our readers a special discount on tickets. UAV Coach readers and community members get 15% off their ticket with code PPWJ.
Go to The Commercial UAV Show website to book your FREE Expo Pass or buy a ticket to the conference with 15% discount with code PPWJ.
The European Drone Market
At UAV Coach, we often publish content specific to U.S. readers—since we are headquartered in Nashville, Tennessee—but we also strive to remain aware of what’s happening around the world. The European drone market has steadily grown over the past year, especially in commercial markets. According to a 2018 study by Drone Industry Insights, a Germany-based market research and analytics company, “all market players foresee significant market growth for commercial drone applications.” In the figure below, from the same study, drone manufacturers and users indicated optimistic views of market development in the next 12 months.
Source: The European Drone Industry: Drone Industry Barometer 2018, Drone Industry InsightsIn addition to keeping up with drone industry research, we’ve also reported on European drone companies, such as Delair — a French-owned company that has expanded their end-to-end drone services into international marketplaces, including America. We also should mention the useful resource we compiled on drone laws in Europe organized by country.
We’re proud to support The Commercial UAV Show as a media partner and feel this event will be a great opportunity for our sUAS folks in Europe.
Speaker Lineup for The Commercial UAV Show
Key speakers include executives and industry professionals from prestigious companies such as BAE Systems, Lockheed Martin, PrecisionHawk, Flyability, and many others. The speaker lineup includes:
Aircraft Engineers
- Karthik Balakrishnan, Project Executive – Altiscope, Airbus A^3
- Dragos Margineantu, AI Chief Technologist, Technical Fellow, Boeing Research & Technology
- Nick Colosimo, Strategy & Planning Executive, Global Engineering Fellow, Principal Technologist (Disruptive Technologies), BAE Systems – Air
- Hamed Khalkhali, Director of Engineering – Tactical UAS Business Unit, AeroVironment, Inc.
- Jonathan Brewster, Systems Engineer, Lockheed Martin
- Stéphane Terrenoir, CTO, Delair
- Maj Andrew Huggins, Chief Air Engineer Miniature Unmanned Air Systems – 1 ISR Brigade, British Army
- Ally Ferguson, Director, Airspace Research, PrecisionHawk
- Patrick Thevoz, Co-Founder and CEO, Flyability
Other Industries
- Jan Georgopoulos, BIM & Digital Engineering Specialist: GIS & Survey, Skanska
- Kevin Cardona, Directeur de l’Innovation – Chief Innovation Officer, BNP Paribas Real Estate
- Joe Little, Technology Principal – Digital Innovation Organisation, BP
- Greg Agvent, Senior Director of National News Technology, CNN
- Jacques van Tonder, Chief Advisor – Asset Management and Infrastructure, Rio Tinto
- Eric Murray, Principal Engineer, Vodafone
Download the agenda to see who else is speaking, and find out what they will be discussing.
Suppliers
During the exhibition, attendees will also have the opportunity to meet key suppliers. With over a hundred exhibitors they’ll get to see the latest innovations, live demos, and a variety of solutions including:
- UAV manufacturers
- Sensor/receptor/camera/battery manufacturers
- UTM, data and geospatial software
- Service providers
- Training
- Test centers
- Insurance
- Consultants
- Resellers
Receive Conference Updates
Following The Commercial UAV Show on social media is the ideal way to stay up to date with all conference announcements, news, and more!
Twitter: Totalunmanned #uavshow
Facebook: Commercial UAV ShowDon’t forget to use code PPWJ when you book your conference ticket online, and let us know if you plan to attend by hopping into this thread on our community forum.
The post Europe’s Largest Commercial UAV Event Set to Take Place in London this November: The Commercial UAV Show appeared first on UAV Coach.
-
Have you participated in the Federal Aviation Administration’s (FAA) drone webinar series this summer? The series is intended to help drone operators submit better waiver requests when applying for an operational waiver. So far, they’ve already covered topics including how to apply for a FAA waiver, how to conduct a risk assessment for your operation, and how to successfully apply for a nighttime waiver. With these webinars, the FAA has been able to answer some of the most commonly asked questions by drone pilots and provide answers with clarity that you seldom find elsewhere.
If you missed out on the first few webinars, don’t worry — the series isn’t over yet, and there’s still time to register for the four remaining webinars. Through August and September, FAA experts will continue to host live online webinars to discuss the waiver process, provide examples of successful waiver applications, and answer your most pressing questions.
What You Can Learn From the FAA Summer Webinar Series
The most important takeaway from the FAA summer webinar series will be information on how to apply for a waiver and best practices for increasing the chance of approval. Drone pilots can request waivers for flights typically prohibited by FAA regulations such as flying a drone at night, flying beyond the visual line of sight (BVLOS), flying above 400 feet, or flying over crowds of people.
During the webinar series, you will learn:
- The waiver application process
- When to apply for a waiver
- Common waiver requests
- Common waiver application mistakes
- Risk management, hazard recognition, risk analysis and assessment
The upcoming schedule includes discussion on waivers for operations BVLOS, over people, and above an altitude of 400 feet. Nighttime waivers were covered previously in a two-part webinar earlier this summer, but you can still check out our article, “How to Fly Your Drone at Night: Applying for a Part 107 Daylight Operations Waiver” for guidance.
FAA Summer Webinar Series Schedule, Aug. – Sept.
Here are the upcoming FAA summer webinars for August and September:
August 7, 2018 – “The Good, The Bad, The Ugly”
Using real examples, this session reviews what a successful and unsuccessful waiver application looks like.
August 21, 2018 – “Beyond Visual Line of Sight”
Why is a BVLOS waiver so difficult to obtain? This session focuses on the “holy grail” of waivers. Is it impossible? No. Will it take more effort than applying for a night waiver? Definitely.
September 4, 2018 – “Operating Limitations: Altitude”
Learn how to fly above the 400 feet altitude ceiling with an operation limitation (altitude) waiver.
September 18, 2018 – “Operations over People”
Why are there so few approvals for this waiver? In this session, FAA experts address the mitigation necessary to ensure your operation doesn’t endanger people on the ground.
Register for the Free FAA Summer Webinar Series
Registration is on a first-come, first-served basis, and caps at 1,000 attendees.
Why Bother with Waivers?
The Small UAS Part 107 rule is designed to minimize risks to other aircraft, people, and property on the ground. The rule includes the option to apply for a certificate of waiver, which allows for a small UAS operation to deviate from certain operating rules if the FAA finds that the proposed operation can be performed safely.
Waivers expand the possibilities of what you can do with your drone, whether it be gathering aerial footage of a crowd at an event, inspecting utility infrastructures from a high elevation, or another innovate use of drones. Understanding how to obtain a waiver will increase your potential as a drone pilot, open up more drone job opportunities, and widen the possibilities of what you can accomplish with your drone.
Part 107 waivers are commonly requested for:
- Flying at night
- Flying directly over a person or people
- Flying from a moving vehicle or aircraft, not in a sparsely populated area
- Flying multiple aircraft with only one pilot
- Flying beyond the pilot’s visual line-of-sight
- Flying above 400 feet
- Flying near airports / in controlled airspace
The FAA makes public who has received a waiver. Reviewing this list can give you an idea of the types of waivers submitted and approved. It also enables employers, law enforcement, and other interested parties to validate that a drone operator posses the waiver they claim to have.
The penalty for unauthorized UAS flights can involve a heavy fine. In a 2015 case of multiple violations, the FAA proposed a $1.9 million penalty on SkyPan for conducting 65 unauthorized operations, violating airspace regulations and various operating rules. The FAA and Skypan reached a settlement agreement of $200,000, reducing the fine significantly but still proving the importance of gaining proper authorization for all UAS operations.
Additionally, technology and science media outlet Motherboard acquired and shared a list of every drone pilot ever fined by the FAA. The list revealed fines ranging from $400 to $5,500.
The lesson to be reaped from all this is that it’s better to do your paperwork for the proper waiver than to risk a fine. A fact sheet covering the FAA drone rules under Part 107 is available here.
FAA Webinars Year Round
With a heavy focus on safety, the FAA offers multiple opportunities for UAS education. Beyond the FAA Summer Webinar series, the FAA hosts webinars year round.
The FAASTeam sponsors thousands of aviation safety seminars and webinars throughout the country. These informative courses include a variety of topics designed to reduce risk and increase safety in aviation operations. You can search the seminar and webinar database to locate a seminar near you or to register for an online webinar. A huge bonus is that most courses are free.
If you’ve attended a FAA webinar, tell us about your experience on the UAV Coach community forum.
The post Gain a Better Understanding of the FAA Waiver Process | FAA Summer Drone Webinar Series appeared first on UAV Coach.
-
The Jumper T8SG and new deluxe T8SG V2 & V2+ represent the first mass market quasi universal radiocommand. Both of them are based on the excellent DeviationTX OS. In the other hand, FrSky Taranis owner communauty were a bit jalous of such cheap solution and can’t imagine to something else than OpenTX. Like the invisible clustering between iOS and Android, DeviationTX and OpenTX got their own fans who can’t imagine to cross the border.
Jumper will introduce soon the T12: https://www.banggood.com/Jumper-T12-OpenTX-16CH-Radio-Transmitter-with-JP4-in-1-Multi-protocol-RF-Module-for-Frsky-JR-Flysky-p-1331683.html
This radio is first non-FrSky based supporting OpenTX and a 4-in-1 Multimodule… for almose=t three times more cheaper than Taranix+Multimodule combo solution. The T12 is based on the same chassis of the T8SG V2… so with a small 1.7″ LCD screen, non-hall effect based gimbal (but improved versus the first T8SG ones). We can probably expect soon to see the introduction of the T12+ with hall gimbals and a OLED screen. Thanks to OpenTX and the JR bay, Crossfire long range TX module are supported (in theory, DeviationTX can support also this possibility but not yet implemented AFAIK). As the V2, the T12 can be powered via 4xAA batteries or via a 2S LiPo/LiHv element. Both the radio and the JP4-in-1 own a USB port to upgrade their OS/firmware respectively. Seems to be an excellent cheap radio alternative OpenTX based. Wait & See of course.Introduction:
the T12 version does indeed support Crossfire and in CRSF mode with LUA script support and most importantly WITHOUT any hardware modification for end users.The T12 platform is shipped with the JP4-in-1 Multi-protocol module.
such as the TBS Crossfire or any other compatible 2.4ghz JR Module, Analogue or Long Range UHF system, the T12 is ready to rock out with its socket out!A standard LCD screen was used along with the T8SG V2 butter smooth V2 gimbals.
The T12 comes standard with a neck strap and AA battery tray. Can also be powered with any LiPO or LiFE battery of a compatible size ( Which means that users do not need to source their own uncommon sized Li-ion round cells or a round cell charger.)
The T12, when paired with the Jumper JP4-in-1 offers seamless intergration between the OpenTX software and module meaning protocals can be accessed and selected directly from the software GUI. Crossfire users can setup their equipment via the OpenTX LUA scripts.
Specification:
Brand Name: Jumper
Model: T12
Item Name: OpenTX 16CH Radio Transmitter with JP4-in-1 Multi-protocol RF Module
Radio Transmitter
Radio MCU: STM32F205VET6 (512kb)
Size: 158 * 150 * 58
Weight: 342g (without battery)
Working voltage: DC5-DC9V (factory with 4 * AA battery box, 2s Lipo recommended, batteries not included)
Firmware: OpenTX
Channels: up to 16 channel output
Display: 1.7-inch LCD display, 128* 64 resolution
Gimbal Type: Potentiometer
JR/FrSKY compatible module bay on rear side
Upgrade method: USB online upgrade
Simulator mode: 3.5mm standard ppm output or USB HID
Voice support: YESRadio Features:
Open source multi-protocol firmware, Based on OpenTX
JR/FrSKY compatible module bay on rear side (module not included)
USB online firmware upgrade
Ultra-low power consumption, longer battery life
Channels: up to 16 channel output
Wide voltage input (2s lipo recommended)
Multilingual menu
Vibration reminder function
Support telemetry (depending on the receiver)
Crossfire CSRF Compatible: Yes
LUA Script support: YesJP4-in-1 Multi-protocol RF Module
Working voltage: 6-9v
Working current: <=100ma
Operating frequency: 2.4G ISM band
RF power: +22DBM
Main control chip: STM32F103CBT6 (128K ROM, 20K RAM)
Module bay compatibility: FRSky, Jr and other dimensions: 64*49*33 (without antenna)
Net Weight: 42g (including antenna)
Software Compatibility: Suitable for radios using OpenTX or er9x/ersky9x
Firmware updatable: Yes, via USB.RF Chip Data
Cypress Semiconductor CYRF6936: DSM/DSMX, Walkera Devo
Texas Instruments CC2500: FrSky, Futaba SFHSS
Amiccom A7105: FlySky, FlySky AFHDS2A, Hubsan
Nordic Semiconductor NRF24L01: HiSky, Syma, ASSAN and most other Chinese modelsRF Module Features:
– the CC2500, NRF24L01, A7105 and CYRF6936 RF Chip modules all integrated on one board.
– can convert standard PPM signals form module equipped radios in to the RF protocols
-This module is plug and play with module equipped radios in the FrSKY series and requires
no complex wiring or “hacking” to get running.
– The Jumper JP4IN1 module is also upgradable via USB inputPackage Included:
1x Jumper T12 Radio Transmitter
1x JP4-in-1 Multi-protocol RF Module
1x Battery Strap
1x USB Cable -
In September 2018, the fourth annual Women in Drones Luncheon, an event that strives to highlight the accomplishments of women in the commercial drone space, will take place at InterDrone, the largest commercial drone conference event in North America.
InterDrone Networking Event: Women in Drones Luncheon
Suzanne Lemieux, UAS Lead and Manager, API (American Petroleum Institute), will host the 2018 event. Other esteemed participants so far include Lia Reich, VP Marketing-Communications at PrecisionHawk, Sharon Rossmark, CEO and Founder of Women and Drones, and Mariah Scott, President of Skyward, A Verizon Company.
An exciting development for the event this year is its partnership with Women and Drones, the largest online platform for women in the unmanned aerial systems (UAS) industry. During the luncheon, Women and Drones will announce the 2018 Women to Watch in UAS list of honorees. These women are have made exceptional contributions to the UAS industry and were selected from hundreds of nominations.
UAV Coach interviewed Sharon Rossmark, CEO and founder of Women and Drones, last year when the Women to Watch in UAS initiative first began. At that time, Rossmark shared that she envisioned the initiative as a way to identify women in the industry who are making an impact. The vision has remained clear this year as judges review hundreds of nominations from around the world and select the finalists to announce at InterDrone’s Women in Drones Luncheon.
InterDrone debuted the first Women in Drones Luncheon in 2015, and it has quickly grown into a model for networking in the commercial drone industry. The 2018 conference will feature more than 120 sessions, panel discussions, and keynotes conducted by renowned industry experts, covering numerous commercial drone applications. Opportunities for networking continue during the InterDrone After Hours sessions, open to all attendees with either a full conference or expo plus pass.
InterDrone will take place at the Rio Hotel in Las Vegas, September 5 – 7. The luncheon will be on Thursday, September 6, from 12:15 pm – 1:30 pm. UAV Coach readers can use the code UAVCOACH for $100 off any of the conference tickets.
Increasing Female Representation in the Drone Industry
The drone industry has created numerous jobs in science, technology, engineering, and mathematics (STEM) fields. Statistically, these job opportunities are more likely to filled by men than women. According to a 2017 report by the Office of the Chief Economist (OCE), “While women continue to make gains across the broader economy, they remain underrepresented in STEM jobs and among STEM degree holders.” In the report, it was found that nearly as many women have degrees as men, but that women make up only 30% of STEM degree holders. Furthermore, it was concluded that women are underrepresented in STEM jobs.
Women filled 47% of all U.S. jobs in 2015 but held only 24% of STEM jobs. Likewise, women constitute slightly more than half of college educated workers but make up only 25% of college educated STEM workers.
— Office of the Chief Economist, Women in STEM: 2017 Update
According to Suzanne Lemieux, UAS Lead and Manager, API (American Petroleum Institute) and luncheon moderator, the Women in Drones Luncheon will help to close the gender gap in STEM fields such as those concerning drone technology.
This is an incredible time for women to enter into this emerging field, to participate in these new developments, and to pave a pathway for more girls to enter into STEM careers. I look forward to moderating the luncheon panel to help build networking opportunities for more women and girls.
— Susan Lemieux, UAS Lead and Manager, API (American Petroleum Institute)
Register for InterDrone
InterDrone, The International Drone Conference and Exposition, is where the commercial UAV industry comes together. It is the most comprehensive conference program along with in-depth drone courses and special events, including the Enterprise After Hours and the Women in Drones Luncheon, as well as meetups designed for networking and keeping drone pilots up to date on the latest in drone news and the industry.
Attendee registration is now open. Pricing is available on their website. Our advice is to purchase your ticket as early as possible for the best deal. Also, remember to use the code UAVCOACH for $100 off your ticket.
UAV Coach has also partnered with InterDrone to arrange a sweepstakes and give away two free tickets to InterDrone. Visit our community forum for details on how to enter for a chance to win one of two free InterDrone tickets before the sweepstakes closes on August 7, 2018, 12AM.
Members of our own UAV Coach team will be at InterDrone 2018, observing how the industry has grown, gaining new knowledge on UAS technology advancements, and meeting other drone companies. We’re so excited to return to this year’s conference. Check out this video of highlights from last year:
And one last thing — let us know on Facebook if you plan to attend InterDrone 2018, and be sure to say hi if you see one of our team members at the conference!
The post Increasing Female Representation in STEM | The Fourth Annual Women in Drones Networking Event Planned for InterDrone appeared first on UAV Coach.
-
Last month the World Economic Forum recognized Delair as a Technology Pioneer. Their selection was noteworthy for two reasons—not only were they the only drone company to be selected, they were also the only company from France to be included on the list.
Those companies recognized were selected based on their potential to “transform society and industry” and to “shape the Fourth Industrial Revolution.”
And it’s easy to see why Delair was selected.
For years now, Delair has been working to push the boundaries of commercial unmanned flying with their innovative fixed wing solutions. In particular their pioneering advancements in BVLOS missions, on both the regulatory and the technological front, open new possibilities for how drones can bring more productivity and efficiency to businesses.
They’ve also been making strategic partnerships with companies like Intel to help push the use of aerial data processing toward actionable insights, and, when it comes to using drones for commercial purposes, they’re one of the leading end-to-end providers in the world.
About Delair
Delair was founded in France in 2011, and since then they’ve largely been known for their work in creating fixed wing drones for commercial applications, including uses in mapping & surveying, oil & gas, mining, agriculture, construction, and transportation. Last year they were selected by the French government as an accredited supplier of UAVs to French government agencies.
The company currently employs over 120 people worldwide, and they have a presence in over 70 countries, with over 80 resellers throughout the world. Their headquarters are in Toulouse, France, with offices in Ghent (Belgium), Singapore, and Los Angeles (USA).
Although they’re commonly known for their fixed wing drones, such as the the UX11, Delair doesn’t only make drones. In fact, it’s an emphasis on the software side of the drone business that is helping them differentiate in the market. They offer an end-to-end solution for large companies, which means that, in addition to manufacturing drones, they offer a full suite of industry-specific analytics software to do aerial data processing as well intuitive flight planning tools.
They also equip their drones with advanced sensing capabilities, including their most recent DT26X Lidar, a platform ideally suited for geospatial professional who require the precision Lidar enables.
Focused on ROI
Return on investment (ROI) has been of one of Delair’s big talking points lately, which is significant because companies—not to mention individual business owners, such as farmers—will only adopt new technology if it can actually help them save money.
According to Delair, although acquiring one of their fixed wing drones might cost more up front than buying a consumer multirotor like DJI’s Phantom or Matrice, the money spent will be returned over time by significantly reducing operational costs and improving productivity.
When Delair looked at the costs required to fly the same piece of land for agricultural data collection using their fixed wing DT18 Ag drone versus a multirotor drone, the results were that, over time, their fixed wing paid for itself because it was so much more efficient than the multirotor. While the fixed wing only required one flight to collect all of the data needed, the multirotor required multiple flights to collect the same amount of data, which significantly drove up the operational costs.
To make this concrete, using the fixed wing over one year to fly an area of about 185,000 acres came out to a cost of about 25 cents per acre, whereas using the multirotor came out to about 6 dollars an acre. When you’re flying a huge piece of land over time, that savings is a huge difference, and will have a big impact on your company’s bottom line—you can read more about Delair’s ROI analysis for agriculture here.
Delair and BVLOS
Delair started early in thinking about the potential benefits of BVLOS drone flights for commercial applications.
In 2011 they developed their first BVLOS prototype, and in 2012 flew the world’s first BVLOS commercial drone mission. Since then they’ve been racked up dozens of BLOS flights across the world have been working to open up BVLOS regulations in the United States (where they have actually done BVLOS flights as well, under applicable waivers).
Drones are the perfect tool to bring the power of big data to large, remote, unequipped locations.
– Michael de Lagarde, CEO of Delair
About one year ago, Delair set a new BVLOS distance record in France with a flight of 30 miles made to inspect power lines for the utility company Réseau de Transport d’Électricité (RTE). The flight also recorded data data used to build models of RTE’s European power grid.
To support the record flight, two pilots were used for takeoff and landing, with the drone itself flying on autopilot using cellular connectivity.
Safety was ensured for the flight through the use of a flight corridor, which France’s civil aviation authority, the Directorate General of Civil Aviation (DGCA) granted Delair to use.
Intel’s Partnership with Delair
Last year, when Intel rolled out its Insight Platform for analyzing, storing, and managing data for commercial drone applications, Intel CEO Brian Krzanich proclaimed that data was the new oil.
Delair is a strategic partner with Intel in the creation of the Insight Platform, which was made in part to help turn the “big data” collected by drones into actionable insights for companies.
It’s all about workflow. What we want is to make this platform the center of aerial data for customers.
– Michael de Lagarde, CEO of Delair
Through the partnership, Intel will be able to draw on Delair’s years of experience in various industry sectors. This experience will help provide key insights into the needs of different industries, which will in turn guide the work needed to make further improvements and customizations to the Intel Insight Platform.
Check out this clip from an Intel demo at InterDrone 2017, which highlighted the Intel Insight Platform:
This article was sponsored by Delair.
Click here to learn about the different ways you can reach our community.
The post Meet Delair, the Only Drone Company Recognized as a 2018 Technology Pioneer by the World Economic Forum appeared first on UAV Coach.
-
Mike Mazur is a Drone Pilot Ground School alum with a huge range of experience in cinematography.
He started out working in Manhattan in post-production. From there he learned about shooting and directing, and built up his skill set to the point where he is now, as the owner of his own production company, Diario Films. Mike has worked with artists like Kesha and Steely Dan, and he’s also flown missions for non-profits in Guatemala and elsewhere around the world.
We wanted to sit down and talk to Mike both about how he built up his production business, and also about his decision to add drones to his list of tools as a cinematographer.
A music video on which Mike was both Aerial Cinematographer and Camera Operator
—
Begin interviewTell us about your background. How did you first get into work as a photographer and cinematographer?
My career started out very differently from many drone pilots I’ve met and heard about.
I first started work in photography and videography in post production, as an editor and and after-effects artist. For a significant part of my career I was managing a green screen studio in lower Manhattan, and only did post production work.
But after a while that work became tiresome, and I realized that I didn’t really want to spend the rest of my life in a dark room, looking at other people’s adventures.
So I eventually got a job as a producer, because I had been producing some of the shoots that we had done in lower Manhattan (including one with our current president, which was a funny experience).
The agency I was working for, which was called Cross Borders, eventually merged into another agency called Rain, and that was a creative agency where I handled projects in which we were creating digital content for corporations to use in one form or another. We worked with companies like Walmart, Subway, and Hess.
Although I wasn’t very enthusiastic about a lot of the more corporate work, we got to make a short documentary series about sports in America to be used in tandem with the 2012 Olympics, and I really loved that work. The goal of the series was to showcase how American society looks at sports—we did an episode on the Special Olympics, one on Jackie Robinson, things like that.
While at Rain, in addition to working in production I started picking up a camera. The first thing I really learned how to shoot well was a time lapse—I’d always be shooting time lapse photography while these bigger projects were going on. But we’d always hire a cinematographer and a director of photography to come and shoot the project for me.
And then, when I was 29, I had a sort of serendipitous occasion on a trip to Guatemala, back in January of 2013. I ended up getting a fellowship with a non-profit there, and staying for the entire year of 2013 doing work in both Central America and Southeast Asia.
To do this work, I would literally go from country to country, from town to town, with a big backpack that had a camera, a tripod, and a laptop. So I was finding stories, shooting them, directing them, editing them—I was delivering them, all by myself. And that was one of the coolest experiences of my life.
When I came back from that year I had so much experience to draw from for my work in cinematography.
I wanted to finish a documentary I’d started about a famous figure in Puerto Rico, so I teamed up with my friend Fernando, who is a brilliant cinematographer, and we raised a few thousand dollars through an Indiegogo campaign, and we spent two weeks on the island and were able to finish the project.
Around the same time, I met a producer named Matty Parker, who had just secured the life rights for the story of a man who was the first African American to play in the NBA, who is named Earl Lloyd. The NBA film premiered a little while back at the Hamptons International Film Festival, and we’ve secured international distribution, so we’re really excited about that.
So that’s the story of how I went from work in post-production to getting behind the camera.
What made you start using drones in your work?
It’s kind of a funny story.
At the same time DJI released the Osmo, which allows you to get incredibly smooth shots, and the X5 Handle—but the two didn’t actually work together.
They said it would, but in reality, it just didn’t. (The following spring, after releasing these two products, they released a little piece that allowed you to connect one to the other.)
The X5 handle was pretty expensive—it cost more than $2,000—but I couldn’t use it since it didn’t connect to the Osmo, so for a while I just had this really expensive paper weight sitting in my office.
At the same time, I’d been wanting to expand my repertoire and my business, and so I just compulsively bought a DJI Inspire 1 and started flying.
Check out this reel of Mike’s drone footage
How did you first start using drones as a commercial pilot?
The first time I flew a drone on a shoot was for a job in Guatemala, for a non-profit called the Friendship Brigade, which does loans to women in rural areas to help them start businesses. (This was on a return trip, not during my first period there where I was given the job to travel around the world.)
After that first experience, I realized that I really loved shooting with a drone, and I realized how much it improved the quality of the work that I did there.
The piece I made for the non-profit was a profile of a woman named Gilanda. She used the loans to really improve her life, and she helped all these other women in the community improve their lives.
Being able to follow her from the sky, and to shoot her house, was huge, since part of what she did with the money she borrowed was expand her home. And even at the end of the video I was able to get a great shot with my Inspire I that really helped close things out.
A picture of Mike in Guatemala with his droneHave you ever crashed during a shoot?
Who hasn’t?
No, but seriously, I definitely have had to deal with a crash, and it was heart breaking.
I was in Puerto Rico working on that documentary I talked about earlier, and still fairly new to flying. I was flying near a lake, and decided to pull back a bit without turning the camera around and looking at what was behind the drone—I just impulsively went backwards, and I got the drone stuck in a tree, about a hundred feet in the air.
Before I knew it a local man was chopping down the tree to get the drone back, and he’d cut it down within less than ten minutes with his machete. And I watched in agony as the tree turned in the air, at the last minute, and completely crushed the drone.
It was definitely a learning experience. Since then I’ve been through the Drone Pilot Ground School course, and I know a lot more about how to check yourself and be careful when you’re flying, to prevent those types of scenarios from arising in the first place.
When did you start flying commercially in the U.S.?
I shot abroad quite a bit, in Guatemala, Costa Rica, Puerto Rico, India, France, both with a drone and with other equipment
And finally, when I was back in the U.S. and ready to work I decided I wanted to pursue Part 107 certification and became a professional drone pilot here.
I made the decision for a few reasons: I wanted to know the material, I wanted to get better at flying—and I figured the certification process would push me to do that, too—and I also wanted to separate myself from other cinematographers, who either weren’t flying drones at all, or who were flying drones illegally.
This was in late 2016, shortly after the Part 107 rules had come out, and I knew a few cinematographers who would just use a drone in shoots without knowing the rules at all. They’d show me their drone footage, and some of it would just be so illegal.
A drone picture Mike took on one of his many tripsHave you ever had to turn down work because it would violate the Part 107 rules?
There have been multiple times where I’ve had to turn down jobs because I didn’t have the night time waiver, which I applied for and wasn’t able to get.
I’ve also had to turn down work in New York City on a few different occasions. Even though many locations in New York look like they’re OK for flying when you’re in the AirMap app, you then learn that the reality is way more confusing. And, of course, NYC claims to have a city-wide ban on drone flights, but even that doesn’t actually seem legal, it’s just something that the city has put on their website to discourage people from figuring out where they actually can and can’t fly.
Basically, it’s so confusing that I’ve decided not to do it, since I don’t want to risk breaking the law.
How do you typically find clients?
Word of mouth is key.
Every job I get is essentially stems from an existing group of contacts that I’ve built gradually over the years, and we all support each other and give each other work. Almost everything I do is an extension of some kind of work, some kind of contact that I’ve made in the past through previous networking. Your experience just snowballs.
If a contact I have sends me any kind of opportunity, I’ll immediately stop what I’m doing and apply to it. And often, because it comes along with my contact’s recommendation, I’ll get the job.
Of course, your work has to be solid enough to get your foot in the door, and you also have to be able to deliver when you show up to do the job.
One thing I did that helped me get work, and really distinguish myself, was that when I upgraded my cinematography services and started adding drone services as well, I made sure to send out emails to my contacts and let them know, and share my aerial reel.
And actually, creating that reel was one of the most important things I did to get those new clients who were interested in aerial shots. After my first drone shoots in Guatemala, I did some aerial shoots in New York and New Jersey, just flying around my family’s home, and put a reel together to show off my new skill set.
The key is to just keep chipping away—adding on footage to your reel, making it better and more diverse as you get more jobs, and also to keep adding on skill sets.
If you make it your goal to keep growing and keep getting better at what you do, you will find work—it may not always be easy, but it will come.
The post Adding Drones to Your Cinematography Repertoire: An Interview with Mike Mazur, Owner of Diario Films appeared first on UAV Coach.
-
INTRODUCTION
The ARRIS X210S is 210mm FPV racer with 5″ props. It’s based on solid ingredient. 5mm carbon arms, 30A BLheli_S/Dshot600 ESC 4S compatible, strong 2205 (or even better 2206) motors, a great CCD Foxeer camera, a 48CH up to 600mW IRC Tramp compatible VTX. All ingredients are here to have a really nice and powerfull racer. The X210S is proposed in three BNF versions: i) FrSky in D16 mode, ii) FlySky in AFHDS-2A and with iii) specktrum solution.
BOX CONTENT
+ 1 x ARRIS X210S
+ 4 x 5″ props (2 CW, 2 CCW)
+ 1 x Camera OSD board
+ 1 x Velcro band
+ 1 x USB to microUSB cable
+ 1 x Instruction manual (English/Chinese)No spare props …. in the bundle but we have the extra OSD board associated with the Foxeer arrow mini camera.
OVERVIEW
The X210S presents a lower structure fully carbon based with 5mm of section for arms !!!! Super solid. But the machine is not full carbon based, Most of the cage is 5mm aluminium based.
The cage is attached to bottom part via a leg design where in case of frontal crash, most of the energy will be transmitter to rear segment.
-FRONT VIEW
-SIDE VIEW
On top the 48CH VTX IRC Tramp compatible. The VTX’s control is done via the connexion between the VTX and this 5p JST connector with one unique yellow wire.
The RHCP antenna is attached via a specific HF connector. Notice the presence of the cap on the lead cable to filter out most interference/noise from motors.
-REAR VIEW
Two leds pre-programmed in betaflight and centrally a buzzer. You will have to assign a switch for this function, it’s not pre-defined.
-UPPER VIEW
-BOTTOM VIEW
A carbon plate is here to protect the bottom surface of the battery. A foam is also here.-WEIGHT
More than 315g for the machine standalone…. It’s not among the lightest 210mm machineMotors
I received the 2206/2450Kv version…. the most powerfull edition branded directly by arris.
Unfortunatly, there are not 6S compatible.
Camera module
Probably one of the best element in this bundle, the presence of the foxeer arrow mini pro with a FOV of 140 degrees. The two positions JST connector is here to plug the OSD board. By default, some specific foxeer OSD information are displayed in supplement of betaflight OSD ones. There are redondant informations. To turn on/off these OSD information, you will need to long press the up button to enter in the OSD menu of the foxeer camera.
The camera can be tilted from -10 degrees up to 60 degrees.
UNBOXING, ANALYSIS, CONFIGURATION AND DEMO FLIGHT
The machine comes Betaflight 3.3.1 pre-installed. The LEDs, basic flight modes and receiver configuration according to your BNF version comes pre-configured. Unfortunatly, for the FrSky version the XM+ is not flashed with the firmware exporting the RSSI. The relative good news, the receiver is connected via a 5p microJST connector and it’s easy to access to the three wires for the flashing procedure with your favorite taranis radio.
I decided to test exclusively this machine in 4S configuration with some 1300mAh/1500mAh LiPo. In this case, I advise to lower the D values in betaflight around 20 to remove oscillations.
First of all, with the 2206 motors, the machine is extremely powerfull !!!! A real monster. A real kick for each 100% throttle input despite being close to 500g. It’s easy to gain 20m high in a fraction of second. Acro styile figures are super super easy. In acro, the machine is flying on some rails. Good news also, for 6-axis stabilized flght modes, no drift can be observed. I am positively surprized by the rendition of the CCD foxeer camera as well… The WDR algorithm works beautifully. No majors noise can be noticed in the FPV signal… and even with the default 25mW output power, the FPV range exceeds 130m so no problem of FPV range when set to 600mW via the OSD command. With a 1500mAh, you can expect about 5min of flight time in pure acro style !!!! It’s a good.
CONCLUSIONS
A good machine with good electronic elements, well designed and robust. In 4S configuration, this machine flies beautifully. I didn’t see major drawback. In another hand, there are a lot of competitors in this size segment and some are already 6S compatible. In any case, announced around 180USD, the ARRIS X210S is a very interesting machine.
PROS
+ Very durable with 5″ carbon arms
+ Powerfull machine
+ 5″ machine
+ Great CCD camera
+ F4 w/ 30A ESC 4S compatible
+ VTX w/ IRC Tramp support
+ No Jello
+ >5min flight time
+ CheapCONS
– FrSky XM+ not flashed with RSSI compatible firmware
– No extra spare props
– Right-hand thread only for the four motorsThis quadcopter have been courtesy provided by Hobby-wing in order to make a fair and not biased review. I would like to thank them for this attitude.
You can find it actually for 179USD at https://www.hobby-wing.com/arris-x210s-210mm-5-inches-fpv-racing-drone.html -
Remember the C-fly obtain, a clone of the DJI Mavic ?. A complete desaster in most points: poor fligh time, poor gimbal stabilization, poor camera performances, poor software…
Today, they present a clone of the DJI Spark with the C-fly dream: https://www.banggood.com/C-Fly-DREAM-GPS-WIFI-FPV-With-2-Axis-Gimbal-1080P-HD-Camera-Optical-Flow-RC-Drone-Quadcotper-RTF-p-1321873.htmlA 250g machine with a 2-axis stabilization system like the spark… but no mention (and it’s probably not the case) about a potential Electronic stabilization for the yaw direction like the spark. The flight time is announced about 15min, probably 12 maximum in practice. Another important remark… Like the Obtain, videos are shooted in 1080p resolution but no frame rate mentioned. I bet it uses the same sensor with a maximum of 24-25fps!!!! so clearly very choppy recordings in practice. The control is done in the 5.8G band so probably incompatible with some europeans android devices if no channel selection can be done. Ok it’s twice cheaper than a spark but IMHO, it’s urgent to wait first feedbacks about this machine. I am afraid, it will be another DJI wanabee failure…. Wait & See.
Specifications:
Aircraft
Size 148 X 145 X 60 mm (L x W x H)
Wheelbase 175mm
Weight (Battery & Propellers Included) 248g
Motor 18*12mm 1900KV
Max Ascent Speed 2m/s
Max Descent Speed 1.5m/s
Max Speed 20km/h
Max Service Ceiling Above Sea Level 3000m
Max Flight Time 15mins
Max Total Travel Distance 3km
Operating Temperature Range 0~40°
Satellite Positioning Systems GPS/GLONASS
Hover Accuracy Range Vertical: +/- 0.5 m
Horizontal: +/- 0.5 m
(when Optical flow is active): +/- 1.0m
Operating Frequency FCC: 5.150-5.250GHZ
CE: 5.150-5.250GHz
Transmitter Power (EIRP) 5.2GHz FCC:<=23dBm Optical flow system Optical Flow System yes Operating Environment Surface with clear pattern and adequate lighting (lux >15)
Velocity Range ≤1.5 m/s at 6.6 ft (2 m) above ground
Altitude Range 0.5~5mGimbal
Controllable Range Pitch: -90°~0°
Stabilization 2-axis (pitch, roll)Camera
Sensor 1/2.7″CMOS
Lens FOV 110° 42 mm (35 mm format equivalent)
ISO Range Video: 100 – 3200
Photo: 100 – 1600
Image Size 2560*1440
Video Recording Resolution FHD: 1920*1080
Supported File Systems FAT32 (<=32GB)
Photo JPEG
Video MP4
Supported SD Cards Micro SD Max capacity: 32GB.
Class 10 or UHS-1 rating required
Operating Temperature Range 0~40°Live View
Mobile App C-Fly
Live View Quality 720p
FPV Transmission Distance 800m
Required Operating Systems iOS 9.0 or later Android 4.4 or later
WiFi
Operating Frequency 5G
Max Transmission Distance Horizontal: 200m
Vertical: 150m
Max Speed 20 km/h
Max Ascent Speed 2 m/s
Max Descent Speed 1 m/sBattery
Capacity 1000 mAh
Voltage 11.4V
Battery Type LiPo 3S
Energy 10.83 Wh
Net Weight about 72g
Charging Temperature Range 5~40°
Max Power 15W
Charger
Voltage 12.6V
Rated Power 18WRemote Controller (RTF)
Operating Frequency 5GHz
Max Transmission Distance 800m
Operating Temperature Range 0~40°
Transmitter Power (EIRP) FCC: <=26dBm
CE: <=20dBm
SRRC: <=20dBm
Operating Current/Voltage 1.5A@3.7V
Supported Mobile Device Size Thickness Supported: 6.5-8.5mm
Max length: 80mm
Port Types Micro USB
Charge USB port
Max Charging Power 5w
Battery of Remote Controller (RTF)
Capacity 2600mAh
Voltage 3.7V
Battery Type LiPo 18650 1S
Energy 9.62Wh
Net Weight about 60g
Operating Temperature Range 5~40°Features:
– Small total weight is 248g, with a new vision 2-axis gimbal, easy to carry, easy to shoot.
– Precision hover, bulit-in GPS+Glonass system,make the drone stable.
– With advanced Optical flow system, it has better adaptability to all kinds of ground textures.
– With 2-axis gimbal, pitch angle 0°-90°,720P FPV, 1080P high quality video.guarantee a perspective and unique image.
– One key take off/landing. Humanized design,more intelligent flight.
– One key return, will return automatically, make everything simple.
– Dream can fly 15mins, control distance is about 800m.
– Waypoints function, Follow me mode, Fly around mode.
– Low battery protection, flight control fail-safe.Package Included:
1 x C-Fly Dream Quadcopter
1 x 1080P Camera
1 x 2-Axis Gimbal
1 x Transmitter (BNF Version Not Included)
1 x 11.4V 1000mAh Lipo Battery
2 x Propeller
1 x Charger
1 x Tranmitter Battery (BNF Version Not Included)
1 x Tranmitter USB Charging Cable
1 x Manual -
Remember the JJRX H62 Splendor, the first toyquadcopter with a really efficient target tracking ?. Here is a new model with the same advanced tracking system:https://www.banggood.com/HR-SH7-WIFI-FPV-With-1080P-HD-Camera-18mins-Flight-Time-Altitude-Hold-Mode-RC-Drone-Quadcopter-RTF-p-1321874.html
But now we have a 1080p FPV WiFi link instead of the a 720p. Unfortunatly, no builtin DVR to record natively the HD source flux… and also according to the associated photos, no wide-angle lens is installed. Whatever, thanks to the 1200mAh battery, 18min of flight time is advertized. A barometer helps to keep the altitude for indoors/outdoors applications. Three speed modes are pre-programmed to fight some windy conditions. More the SH7 has a gesture recognition system to trigger the photo/video modes. Of course it’s a basic brushed machine, no EIS… but for around 50 bucks, this toyquadcopter can be interesting as a first cheap video plateform.Description:
Item Name:HR SH7 RC Quadcopter
Color: Black, White (Optional)
Quadcopter Size: 32*30*11cm
Take off weihgt:151g
Box Size: 35*16*22cm
Gyro: 6-axis
Frequency: 2.4G
Channel:4CH
Battery: 3.7V (1200mAh) (included)
Transmitter Power: 4 x 1.5V AAA battery(not included)
Flight time: about 18 minutes
Charging time: about 90 minutes
R/C distance: 100m
WIFI transmission distance:50m
Camera Pixel:1080PFeatures:
– Manually capture the targert by intelligent visual trackng system recognition analysis.
Achieve follow-up shooting and customize the locked position of the object in the picture(Tips:indoor open environment operation,outdoor unmanned environment operation)
– Equipped with 1080P high-definition camera,you can easily achieve aerial film-style framing,help you shoot large-scale material.
– With wifi function can be connected APP, APK system to take pictures, video, real-time transmission through the phone camera image.
– With 1200mAh larger capacity battery for longer playing time, flight time up to 18mins.
– Set high,determined by air pressure.With altitude hold mode function provides stable flight.
– With Headless Mode,no need to adjust the position of aircraft before flying .
– With One key to return function makes it easily to find the way home.
– 2.4GHz Technology Adopted for Anti-Interference.
– 4 Channel which can do ascend, descend, forward, backward, left sideward fly, right sideward fly and rolling 360°.
– 6-axis gyro which can have more stable flying and be easy to control.
– It have 3-level flight speed to switch that can make more fun with the flying.
– It can realize 3D tumbling 360°rolling in four directions with 4 LED lights.
– The quadcopter fuselage is made of high strength and resistant engineering plastics,lightweight and durable resistance.Function: Up/down, Forward/backward,Turn left/right, Sideward flight, LED Light, Headless Mode, 3-level flight speed;One Key Automatic Return,Air pressure high hold mode;WIFI FPV;Long battery life;Gesture photo/video, smart follow
Package Included:
1 x SH7 Aircraft
1 x Transmitter
4 x Protection Ring
1 x 3.7V 1200mAh Battery
4 x Propeller
3 x Tripod
1 x USB Charging Cable
1 x Screwdriver
1 x User Manual -
A new competitor of the excellent Runcam split micro is announced by Caddx: https://www.banggood.com/Caddx-Turtles-FOV-145-Degree-Super-WDR-Mini-FPV-Camera-1080P-60fps-DVR-HD-Recording-OSD-for-RC-Drone-p-1320281.html
It’s a 12g module able to record HD video in 1080p@60fps via the builtin microDVR and broadcast the FPV signal. No information about the associated latency.. and it’s a really important missing point. Like the runcam modele the FPV view offers 145 degrees FOV while the HD recording a little bit more wider FOV up to 165 degrees. The camera is in 16:9 format only. Be aware, it’s not a CCD sensor but a 800TVL CMOS 1/2.7″ sensor with a pretty good light sensitivity of 0.01Lux. The good news, is the lighter weight and price versus the runcam model. The camera is linked to the main electronic board via a DJI’s style riboon cable.
Specification
Image sensor: 1/2.7″ CMOS sensor
Horizontal: 800TVL
TV system: NTSC/PAL,changeable
Power Input: DC 4-20V
FOV : 145°
Recording FOV :165°
Mini Illumination: 0.01lux
Dimension: SD Slot Module 28*29mm / Camera 19*19mm (installed with 20*20mm, expand to 30*30mm )
Net weight: 12g(more or less)
Lens: F1.8 Turbo Eye
Color: RED Only
Aspect Ratio: 16:9Package Included
1 x Caddx Turtles Camera -
After the Semi-fiasco of the F7X, TopSky will introduce soon a complete new FPV goggles: https://www.facebook.com/fpvTOPSKY/?hc_ref=ARTqpCCPZig2zc7QgcvOUQ52zOufSJvQH0KquCWz9SMQCt3dhnXkTnXw2bQv73Ufq2c&fref=gs&dti=1779173945719852&hc_location=group
Actually the model don’t have an official name but main new features are:
Characteristics:
-Big FOV (46 degrees)
-SVGA displays (800×600… so no more based on LCOS technology but more on classic LCD/LED)
-Improved DVR
-Quad Diversity (like the EV200D)
-Redesigned receiver bay for be compatible with most after market receiver
-Optimized usability
-Integrated RGB adjustment
-58mm-72mm IPD ajustement
-4:3/16:9 Aspect radio switchableThis new FPV product will be very close from the Eachine EV200D…. TopSky have a lot of pressure over their shoulders….. Their first FPV product was too buggy.


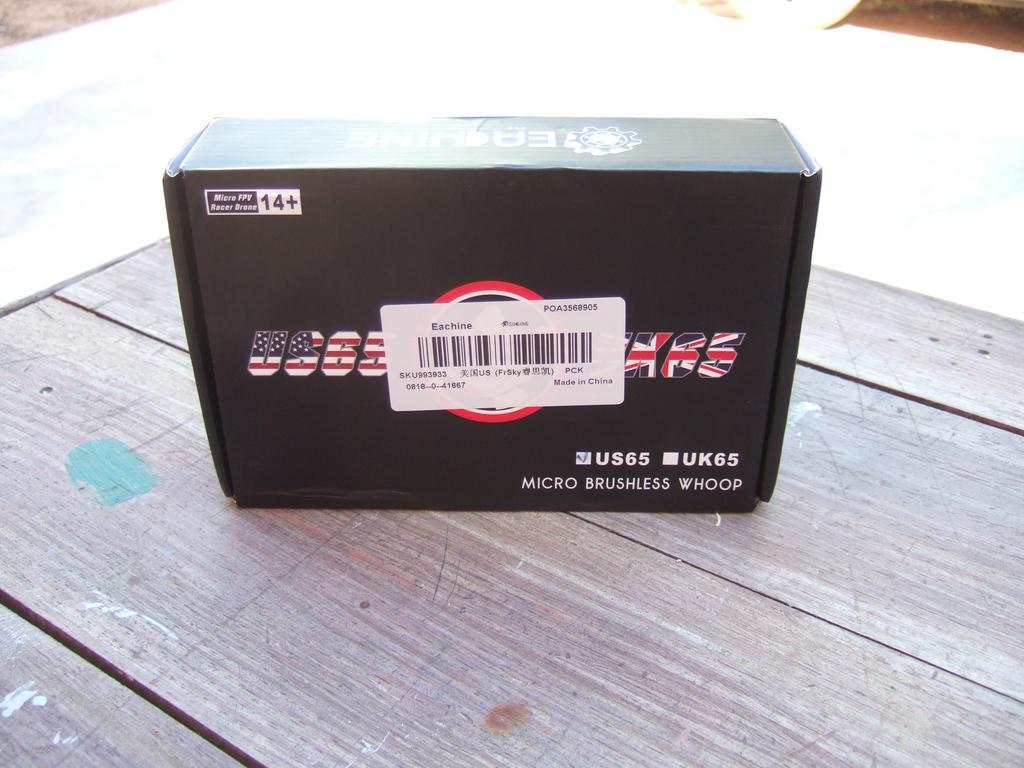 [/url]


NEWS: Racerstar Crazybee F3 Pro 3-in-1 flight controller. The best 20mmx20mm board ?
in RC Drone Product News
Posted
The Crazybee F3 Flight controller was the major Key element of the last excellent 65mm FPV tinyhoop machine such as the Eachine US65 and the URAV UR65. Good news, a new revision is now announced with Crazybee F3 Pro version:
https://www.banggood.com/Racerstar-Crazybee-F3-Pro-Flight-Controller-5A-1-2S-ESC-Compatible-Flysky-or-Frsky-or-DSMX-Receiver-p-1361634.html
What’s new in the menu ?: now the board is 2S compatible !!!!! Imagine the beast with ultra compact 2S compatible 0603 Motors on a 65mm frame ?. More now they added the UART3 connexion to connect your favoriate smartaudio compatible AIO module. Finally, ESC chips (BB2) are also upgraded to run smoothly Dshot600 !!!!. That’s great. ESC are still 5A (peak@6A) rated. Strong enough for 2S power. The Crazybee is still proposed with two choices of builtin SPI receivers (FrSky & Flysky) where both telemetry and RSSI exportation to OSD are here. It’s definitively the best flight controller available in 20mmx20mm format. 4.2g in total. What else ?
Racerstar Crazybee F3 Pro Flight Controller 5A 1-2S ESC Compatible Flysky/Frsky/DSMX Receiver
Specification:
Brand name: Racerstar
Item name: Crazybee F3 Flight Controller
Flight controller CRAZYBEEF3 PRO FS Firmware target: CrazybeeF3FS
MCU: STM32F303CCT6 (72MHZ, 256K FLASH)
Sensor: MPU-6000(SPI connection)
Board size: 28.5 * 28.5MM
Weight:4.2g
Power supply: 1-2S battery input (DC 3.5-8.7V)
Built-in 5A(each) Blheli_S 4in1 ESC Dshot600 ready
Built-in SPI Flysky receiver with telemetry(D8/D16 switchable)
Built-in Betaflight OSD(SPI Control)
Built-in Current meter Max 28A
Current meter scale set to 1175
Built-in 5V 1A Buck / Boost with LC filter
Built-in voltage detection
BLHELI_S pass-through Ready
Heading LED Ready
Onboard 4in1 ESC MCU upgraded to EFM8BB21
Power supply: 1-2S LiPo/LiPo HV (3.5v/8.7v)
Current: 5A continuous peak 6A (3 seconds)
Support BLHeliSuite programmable
Factory firmware: S_H_50_REV16_7.Hex
Default protocol: DSHOT600
Built-in
Flysky receiver SPI BUS receiver
Protocol: AFHDS and AFHDS-2A Switchable
Channels: 8ch(AFHDS) or 14ch(AFHDS-2A)
No ground interference ( Transmitter and receiver 1 m from the ground): 300m
Failsafe support
Built-in
Frsky NON-EU receiver SPI BUS receiver
Frsky D8/D16 switchable
Compatible Non EU transmitter both D8 and D16 mode
Channels: 8ch or 16ch
Failsafe support
No ground interference ( Transmitter and receiver 1 m from the ground): 300m
Description:
The world first 1-2S Brushless F3 flight controller with internal 4in1 ESC OSD 2.4G receiver Current sensor Buck / Booster is coming. You only need to add a VTX and Camera . It’s a best choice for 2S Brushless tiny whoop.
Package Included:
1 x Crazybee F3 PRO flight controller
2 x Power cables
1 set Shock absorbing rubber and screws
View the full article